How to Start Braiding with Extensions: Your Ultimate Guide to a Flawless Look
Hey there, braid lovers! If you’ve ever dreamed of rocking long, thick, gorgeous braids but your natural hair just isn’t quite there yet, extensions are your secret weapon. Starting a braid with extensions might sound tricky, but trust me—it’s way easier than you think once you know the insider tips and tricks. Whether you’re a total newbie or someone who’s tried (and maybe failed) before, this guide is packed with everything you need to get that perfect braided style. We’re diving deep into the how-to, spilling some hidden gems you won’t find everywhere, and giving you practical, step-by-step advice to make your braids pop. Let’s get started!
Why Braiding with Extensions Is a Game-Changer
Braiding with extensions isn’t just about adding length—it’s about boosting volume, protecting your natural hair, and unlocking endless style possibilities. From box braids to cornrows to goddess braids, extensions let you experiment without limits. But here’s a fun fact most people don’t know: braiding with extensions has been around for centuries! Ancient Egyptians used human hair and wool extensions to create intricate braided looks—talk about a timeless trend!
So why should you care? Well, extensions can save your hair from daily damage (goodbye, heat tools!) and give you a low-maintenance style that lasts weeks. Plus, it’s a chance to channel your inner artist. Ready to learn how to start? Let’s break it down.
Picking the Perfect Extensions for Your Braids
Before you even touch a braid, you’ve got to choose the right extensions. This is where a lot of folks trip up, so let’s make it simple.
What Type of Hair Should You Use?
You’ve got two main options: synthetic or human hair. Synthetic is cheaper and comes pre-styled (think Kanekalon or Toyokalon), while human hair feels more natural and lasts longer. Here’s the scoop:
- Synthetic Hair: Great for beginners. It’s lightweight, affordable, and holds styles well. Bonus? It comes in funky colors if you’re feeling bold!
- Human Hair: Pricier but blends seamlessly with your own hair. Perfect if you want a super natural look or plan to keep your braids in for a while.
Pro Tip: Slightly coarser hair (like wavy or curly textures) grips better when braiding, so it’s less likely to slip out. Smooth, silky extensions? They’re gorgeous but can be a little tricky to work with.
How Much Hair Do You Need?
This depends on your style. For medium-sized box braids, 6-8 packs of synthetic hair usually do the trick. Cornrows might need less—around 4-6 packs. Want jumbo braids? You might get away with 3-5. Here’s a quick guide:
| Style | Packs Needed | Length Suggestion |
|---|---|---|
| Box Braids | 6-8 | 18-24 inches |
| Cornrows | 4-6 | 14-20 inches |
| Goddess Braids | 5-7 | 20-30 inches |
A Little-Known Secret
Did you know some braiders mix synthetic and human hair for the best of both worlds? It’s like a hair hack—synthetic for grip and human hair for that soft, natural vibe. Try it if you’re feeling experimental!
Action Step: Head to your local beauty supply store or order online. Feel the hair before buying—trust your hands to pick what feels right for you.
Prepping Your Hair and Extensions Like a Pro
You wouldn’t build a house without a solid foundation, right? Same goes for braiding. Prepping is everything.
Step 1: Clean and Condition Your Natural Hair
Start with a fresh canvas. Wash your hair with a clarifying shampoo to remove buildup, then deep condition. Why deep condition? Because your hair will be tucked away for weeks, and you want it strong and hydrated.
- ✔️ Do: Use a sulfate-free shampoo and a thick, moisturizing conditioner.
- ❌ Don’t: Skip conditioning—it’s like forgetting sunscreen at the beach!
Fun Fact: A 2023 study from the Journal of Cosmetic Science found that well-moisturized hair is 30% less likely to break under tension. So, slather on that conditioner!
Step 2: Detangle Like Your Life Depends On It
Grab a wide-tooth comb and gently work through knots. Start from the ends and move up to the roots—less pulling, less pain.
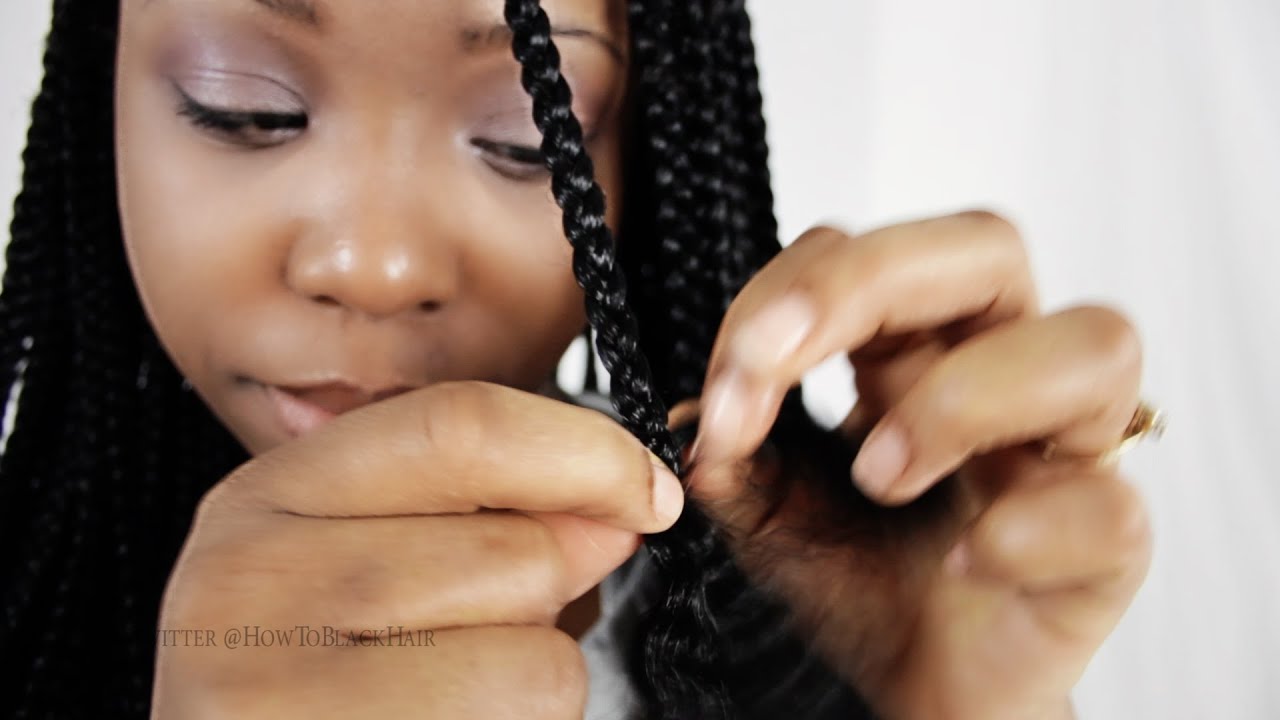
Step 3: Prep Your Extensions
Unpack your extensions and give them a quick rinse (especially synthetic ones) to remove any factory coating. Then, separate them into small bundles—about 1-inch thick. This makes grabbing the right amount later a breeze.
- Hack: Hang your bundles over a chair or towel rack to air-dry. It keeps them tangle-free and ready to go.
Real Talk: I once skipped detangling my extensions and ended up with a lumpy braid disaster. Learn from my mess—prep is your friend!
Mastering the Technique: How to Start Your Braid
Now, the moment you’ve been waiting for—actually starting the braid! This is where the magic happens.
Step-by-Step Guide to Starting a Braid with Extensions
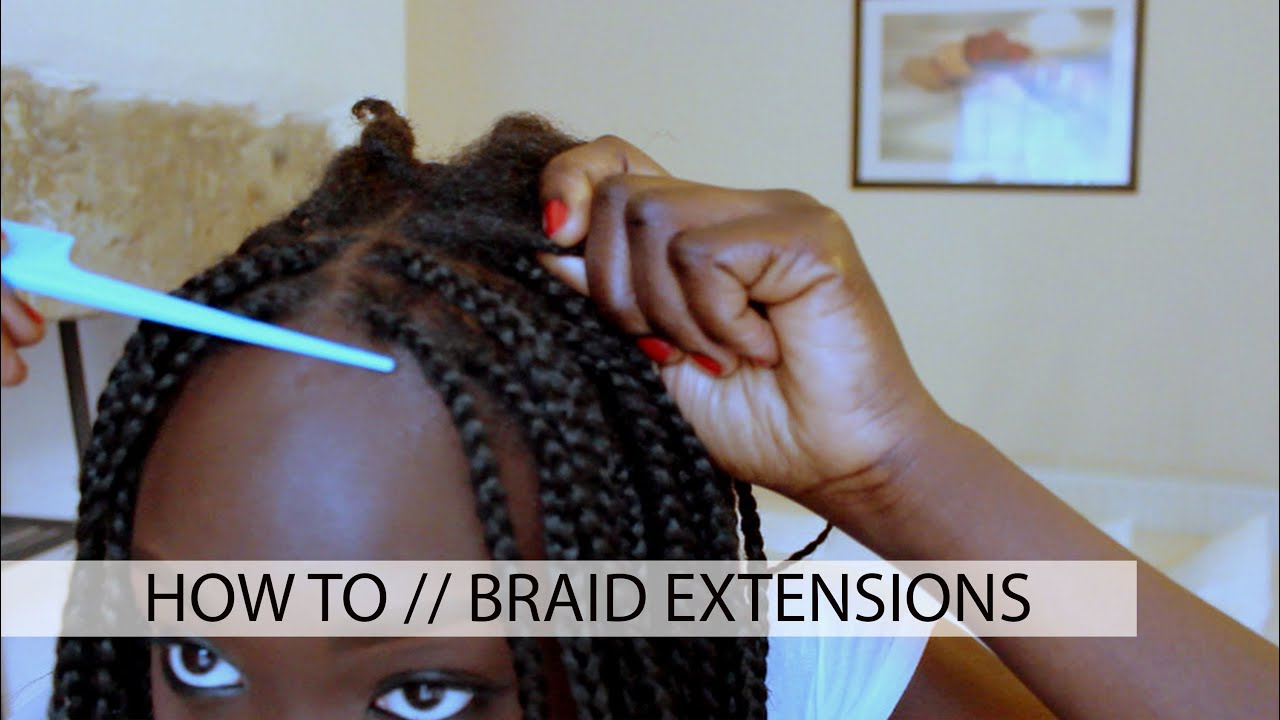
- Section Your Hair: Part your natural hair into small, even sections (¼ to 1 inch, depending on your style). Use clips or elastics to keep the rest out of the way. Start at the nape of your neck to avoid tangles.
- Grab Your Extension: Pinch off a piece of extension hair that matches the thickness of your natural section. Too much = bulky braids; too little = skinny, uneven ones.
- Fold and Loop: Fold the extension in half like a “U” shape. Hook the middle around your natural hair so you’ve got three strands: two extension pieces and your natural hair in the middle.
- Secure the Base: Pinch the top where the extension meets your hair and start braiding tightly for the first few crosses. This locks everything in place.
- Blend and Braid: Keep braiding, blending the extension with your hair as you go. Pull gently to keep it smooth but not so tight it hurts.
Visual Tip: Imagine you’re weaving a tiny basket—over, under, over, under. That’s the rhythm!
Common Mistakes to Avoid
- ❌ Pulling Too Tight: It can cause scalp pain or even hair loss (traction alopecia, anyone?).
- ✔️ Fix: Keep tension firm but comfy—your scalp should thank you, not curse you.
- ❌ Uneven Sections: Leads to wonky braids.
- ✔️ Fix: Use a rat-tail comb for precise parts.
Expert Quote: “The key to a great braid start is balance—too loose and it falls apart, too tight and you’re in pain,” says Amber Rose, a licensed cosmetologist with over a decade of braiding experience.
Leveling Up: Advanced Tips for Flawless Braids
Okay, you’ve got the basics down. Now let’s kick it up a notch with some insider tricks that’ll make your braids stand out.
Add a Little Texture
Before braiding, lightly mist your extensions with water or a texturizing spray. It adds grip and keeps flyaways in check. For synthetic hair, a tiny bit of gel works wonders too.
The “Feathering” Trick
Ever notice how some braids look lumpy at the ends? To avoid that, feather the extension tips—pull them apart slightly so they taper naturally. It’s a small move with a big payoff.
Speed Up Your Game
Braiding takes time (think 6-10 hours for a full head of box braids). To cut that down:
- Pre-section everything: Divide your hair and extensions ahead of time.
- Team up: Grab a friend to tackle one side while you do the other.
Did You Know?: Pro braiders can finish a head in 4 hours flat. Practice makes perfect!
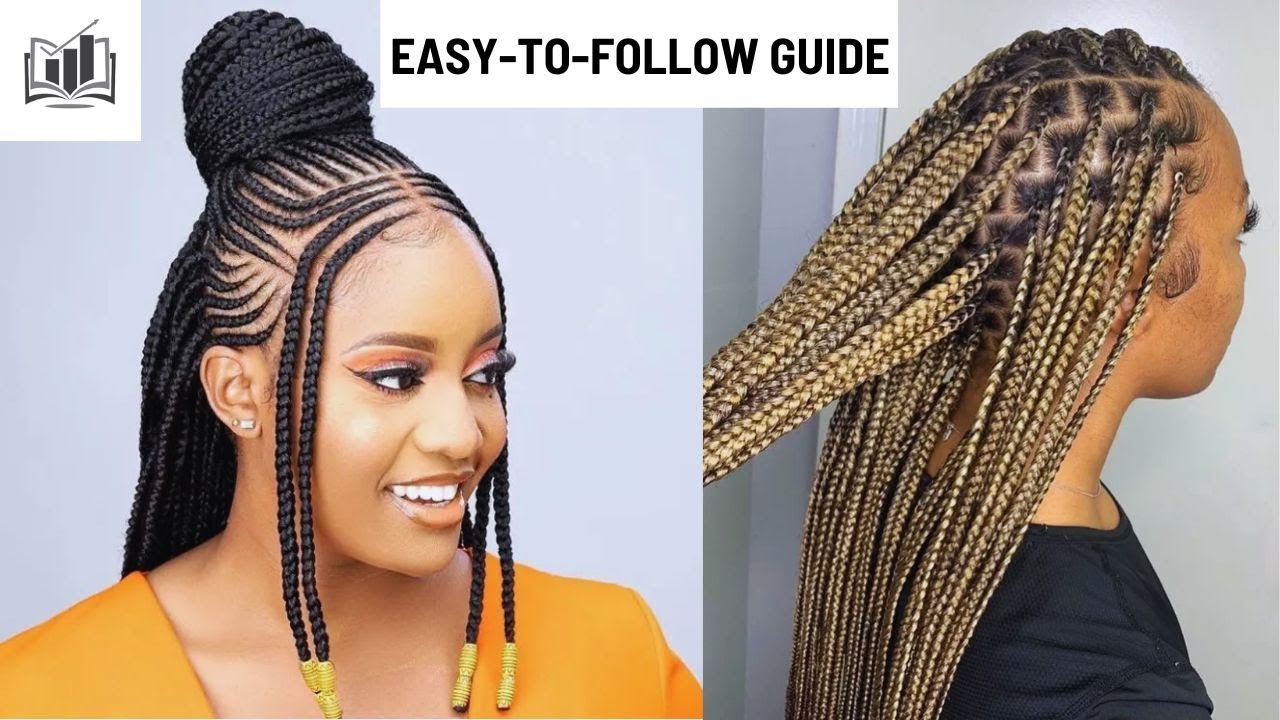
Style Spotlight: Box Braids, Cornrows, and More
Not all braids are created equal. Here’s how to start three popular styles with extensions.
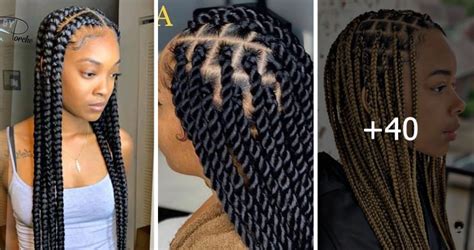
Box Braids
- What: Small, square-parted braids that hang free.
- How to Start: Use the basic technique above. Keep sections tiny (½ inch or less) for that classic look.
- Fan Favorite: Add beads or cuffs for extra flair—90s vibes, anyone?
Cornrows
- What: Tight braids flat against the scalp.
- How to Start: Section a thin row, loop the extension around the base, and braid under (like a French braid) while picking up more hair as you go.
- Hidden Gem: Cornrows were originally a way to map escape routes in the 1800s—talk about history in your hair!
Goddess Braids
- What: Thicker, chunkier braids with a boho twist.
- How to Start: Use bigger sections (1-2 inches) and looser tension. Mix in curly extensions for that goddess glow.
- Trend Alert: A 2024 survey by Hair Magazine found goddess braids are up 25% in popularity this year!
Caring for Your Braids (and Your Scalp)
Your braids are in—congrats! But the work’s not over. Here’s how to keep them fresh and your scalp happy.
Washing 101
Yes, you can (and should) wash your braids! Every 1-2 weeks:
- Mix shampoo with water in a spray bottle.
- Spritz your scalp, massage gently, and rinse with a damp towel.
- Pat dry—don’t rub!
Moisturizing Musts
Dryness is the enemy. Use a lightweight oil (like jojoba or grapeseed) on your scalp 2-3 times a week. For synthetic braids, a leave-in conditioner spray keeps them shiny.
Nighttime Routine
Sleep with a satin scarf or bonnet. Cotton pillowcases suck moisture out and cause frizz—yikes!
Science Bit: A 2022 study from Dermatology Today showed that proper scalp care during protective styles reduces breakage by up to 40%. Keep that oil handy!
Troubleshooting: What to Do When Things Go Wrong
Even the best braiders hit snags. Here’s how to fix common issues.
Slipping Extensions
- Why: Too smooth or not braided tight enough at the start.
- Fix: Undo the braid, add a dab of gel, and restart with firmer tension.
Itchy Scalp
- Why: Buildup or dryness.
- Fix: Rinse with diluted apple cider vinegar (1:4 ratio with water) to soothe and clean.
Uneven Braids
- Why: Inconsistent section sizes.
- Fix: Redo the funky ones—perfection takes patience!
Expert Quote: “Mistakes are just practice runs in disguise,” says Lauren Smith, a braid stylist with a cult Instagram following.
The Emotional Side of Braiding: Why It’s More Than Hair
Braiding isn’t just a style—it’s a vibe. For me, it’s a Saturday afternoon with music blasting, snacks on deck, and my sister laughing as we braid each other’s hair. It’s bonding, creativity, and a little bit of therapy rolled into one. Ever tried braiding while watching your favorite show? It’s my secret to staying chill during those long hours.
What’s your braiding story? Maybe it’s a memory of your mom braiding your hair as a kid or the first time you nailed a style solo. It’s personal, and that’s what makes it special.
FAQs: Your Burning Questions Answered
How Long Should I Keep Braids In?
Most styles last 4-8 weeks. Past that, you risk matting and breakage. Listen to your hair—if it’s begging for freedom, take them out!
Can I Braid Wet Hair?
You can, but it’s risky. Wet hair stretches and might break when it dries. Plus, trapped moisture = mildew (gross!). Air-dry first for safety.
How Do I Stop Frizz?
Light pomade or edge control along the braid edges works like magic. For flyaways, a quick spritz of holding spray seals the deal.
Final Touches: Making Your Braids Uniquely You
Here’s where you shine. Add colorful extensions, thread, or even tiny charms. Ever tried dipping the ends in hot water to seal them? It’s a classic move for synthetic hair that gives a polished finish. Play around—your braids, your rules!
Expert Quote: “Braids are art—don’t be afraid to paint outside the lines,” says Nia Jackson, a hair historian and stylist.
Leave your comment
Related posts