Have you ever wanted to wear your wig for more than just a day? I used to struggle with keeping my wig secure until I discovered the wonders of sewing it in place. Sure, gluing a wig is quick, but sewing it can make it last for a week or more! Let me take you through my personal journey of learning how to sew a wig in place, step-by-step.
Preparing Your Hair and Wig
Step 1: Choosing the Right Wig
First off, you need a lace wig. Trust me, lace wigs look the most natural because the sheer cap lets your scalp show through, giving the illusion that the wig hair is growing from your own head. This is especially awesome when you want to blend your natural hair with the wig.
Step 2: Braiding Your Hair
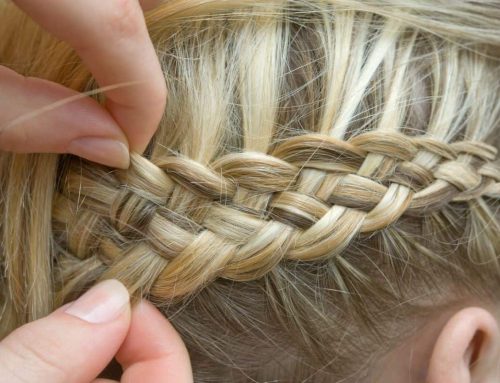
Before you start sewing, you need to braid your hair. I remember my first attempt—it was a bit tricky, but so worth it. You can braid your hair yourself, ask a friend, or even go to a professional. The goal is to get tight braids like cornrows or a beehive pattern. If your hair is long, secure the ends with bobby pins to keep them hidden.
Step 3: Trying on the Wig
Next, put on your wig to see how it fits. Make sure the edges line up with your natural hairline and that the wig covers all your braids. This step is crucial to ensure everything looks seamless.
Step 4: Clipping the Wig in Place
To make sewing easier, use clips to hold the wig in place. This prevents it from shifting and keeps the hair out of your way. It’s especially handy if you’re working with a long wig.
Step 5: Trimming the Lace
With the wig on, trim any excess lace that extends past your natural hairline. This helps the wig blend better with your scalp. Be careful not to cut too much—you just want to remove the extra lace.
Step 6: Preparing Your Needle and Thread
Finally, thread a hair weaving needle with about 18 inches of weave thread. This thread is thicker than regular sewing thread, which helps keep the wig secure. Tie a knot at the end of the thread, and you’re ready to start sewing.
Sewing at Strategic Points
Step 1: Parting the Wig Hair
Start by parting the wig hair just behind your ears and going up and over your head. This is where you’ll sew the first seam. Use a comb or your fingers to make a clean part.
Step 2: Sewing from Ear to Ear
Insert the needle through the wig and into your braid, making sure not to poke your scalp. Sew in a straight line from one ear to the other, keeping your stitches about half an inch apart.
Step 3: Securing the Temples
Next, sew the wig near your temples, just in front of your ears. This helps keep the wig secure and looking natural, as most natural hairlines come to a point in this area.
Step 4: Sewing in Hidden Areas
To make sure the wig is fully secure, sew in areas where you don’t usually part your hair. This way, the seams are hidden, but the wig stays in place. For instance, if you usually part your hair in the middle, sew in parts to the side and back.
Step 5: Finishing Up
Once you’ve sewn all the necessary areas, cut and tie the thread. Make sure to tie it securely so the wig stays put.
Styling and Maintaining Your Wig
Step 1: Blending the Edges
For a more natural look, use a toothbrush to blend the edges of the wig with your baby hairs. Gently tease out some of your baby hairs along the hairline to help the wig blend better.
Step 2: Washing Your Wig
Just like your natural hair, wigs need to be washed. Whether it’s human hair or synthetic, wash your wig every 10 wears or after any sweaty activity. If your wig is synthetic, remember to let it air dry since heat can damage it.
Step 3: Styling Your Wig
Human hair wigs are the most versatile—you can blow-dry, style, and even dye them. Use curling irons or flat irons to create different looks. For synthetic wigs, stick to non-heat styling methods like foam rollers.
Step 4: Daily Care
To keep your wig looking great, comb or brush it daily. Start from the ends and work your way up to avoid tangles. If you hit a stubborn knot, a bit of leave-in conditioner can help.
Step 5: Protecting Your Wig at Night
At night, wear a satin cap to protect your wig from tangling while you sleep. If you’re not a fan of caps, a satin pillowcase works too. This helps keep your wig smooth and ready for the next day.
My Wig Sewing Tips and Tricks
Let me share a few tips from my own experience:
- Take Your Time: When I first started sewing my wigs, I was in a rush and made mistakes. It’s better to go slow and get it right.
- Practice Makes Perfect: The more you do it, the better you’ll get. My first few attempts weren’t perfect, but I improved each time.
- Ask for Help: If you’re struggling, don’t be afraid to ask a friend for help. I learned a lot from watching others and getting tips from more experienced wig wearers.
Conclusion: Embrace Your Inner Stylist
Sewing in your wig might seem daunting, but it’s a fantastic way to keep your wig secure and stylish for longer periods. With practice, you’ll get better and faster. So grab your needle and thread, and give it a try! You’ve got this!


