How to Section Hair for Braiding: Your Ultimate Guide to Perfect Braids
Hey there, braid lovers! Whether you’re dreaming of sleek cornrows, chunky box braids, or a cute French braid for school, one thing’s for sure: sectioning your hair is the secret sauce to nailing that flawless look. You might think braiding is all about the weaving, but trust me—how you split up your hair before you even start is what makes or breaks the style. Messy sections? You’ll end up with lumpy braids that unravel in a day. Clean, even sections? You’re rocking a vibe that lasts for weeks.
In this guide, we’re diving deep into everything you need to know about sectioning hair for braiding. I’ve got tips you won’t find in every random tutorial, plus some sneaky hacks I’ve picked up from years of trial and error (and a few epic hair fails!). Think of this as your braiding BFF spilling all the tea—because I’m not just here to tell you what to do, but why it works and how to make it fun. Ready? Let’s get those sections on point!
Why Sectioning Hair Matters More Than You Think
Sectioning isn’t just a boring prep step—it’s the foundation of every braid you’ll ever do. Imagine building a house: you wouldn’t skip the blueprint and just start slapping bricks together, right? Same deal with braiding. Good sections keep your braids neat, even, and strong. Skip this, and you’re left with a hot mess that falls apart faster than a cheap friendship bracelet.
Here’s the real talk: uneven sections lead to uneven tension, which means some braids will be tight and others will flop around like noodles. Plus, if you’re adding extensions (hello, box braids!), messy sections make it impossible to blend your natural hair with the synthetic stuff. The result? A lumpy, awkward look that screams “I gave up halfway.”
But it’s not just about looks. A 2023 study from the Journal of Cosmetic Science found that proper sectioning reduces hair breakage by up to 30% during braiding. That’s because even sections spread the tension across your scalp instead of yanking on random strands. Less breakage = healthier hair = more braiding adventures. Win-win!
What You’ll Get Out of Perfect Sections
- Neater braids: No random flyaways or weird bumps.
- Longer-lasting styles: Even tension keeps braids secure for weeks.
- Less pain: No more scalp screaming from tight, uneven pulls.
- Faster process: Once you’ve got the hang of it, sectioning speeds up your whole routine.
So, let’s break it down and get those sections popping!
Tools You’ll Need (And Some You Didn’t Know You Wanted)
Before we dive into the how-to, let’s talk tools. You don’t need a fancy salon setup, but having the right gear makes sectioning way easier—and dare I say, kinda fun? Here’s your must-have list, plus a few quirky extras that’ll make you feel like a pro.
The Basics
- Rat-tail comb: That skinny end is your bestie for straight, clean parts.
- Hair clips or duckbill clips: Keeps unsectioned hair out of your face.
- Spray bottle with water: Damp hair is easier to control (more on that later).
- Mirror: A handheld one works if you’re braiding your own hair.
The Fun Extras
- Edge control gel: Not just for baby hairs—dab it along your parts for razor-sharp lines.
- Colorful mini elastics: Secure sections and add a pop of personality.
- A playlist: Okay, not a tool, but braiding’s better with some tunes. (My go-to? Anything upbeat—think Lizzo or early 2000s throwbacks.)
Quick tip: If you’re a fidgeter like me, keep a stress ball handy. Sectioning can take time, and it’s tempting to rush. Squeezing something keeps your hands busy while you focus.
Step-by-Step: How to Section Hair Like a Boss
Alright, let’s get to the good stuff—how to actually section your hair for braiding. This isn’t just a boring list of steps; I’m throwing in some real-life hacks I’ve learned from my own hair struggles. Whether you’ve got thick curls or pin-straight strands, I’ve got you covered.
Step 1: Start with Clean, Detangled Hair
You wouldn’t paint a dirty wall, so don’t braid tangled hair. Wash or co-wash your hair, then detangle with a wide-tooth comb. Wet hair is easier to manage, but if you’re team air-dry, just mist it with water from your spray bottle.
✔️ Pro move: Add a leave-in conditioner. It makes hair slippery and less prone to snagging.
❌ Don’t: Skip detangling. Knots mess up your sections and turn braiding into a nightmare.
Step 2: Decide Your Braid Style
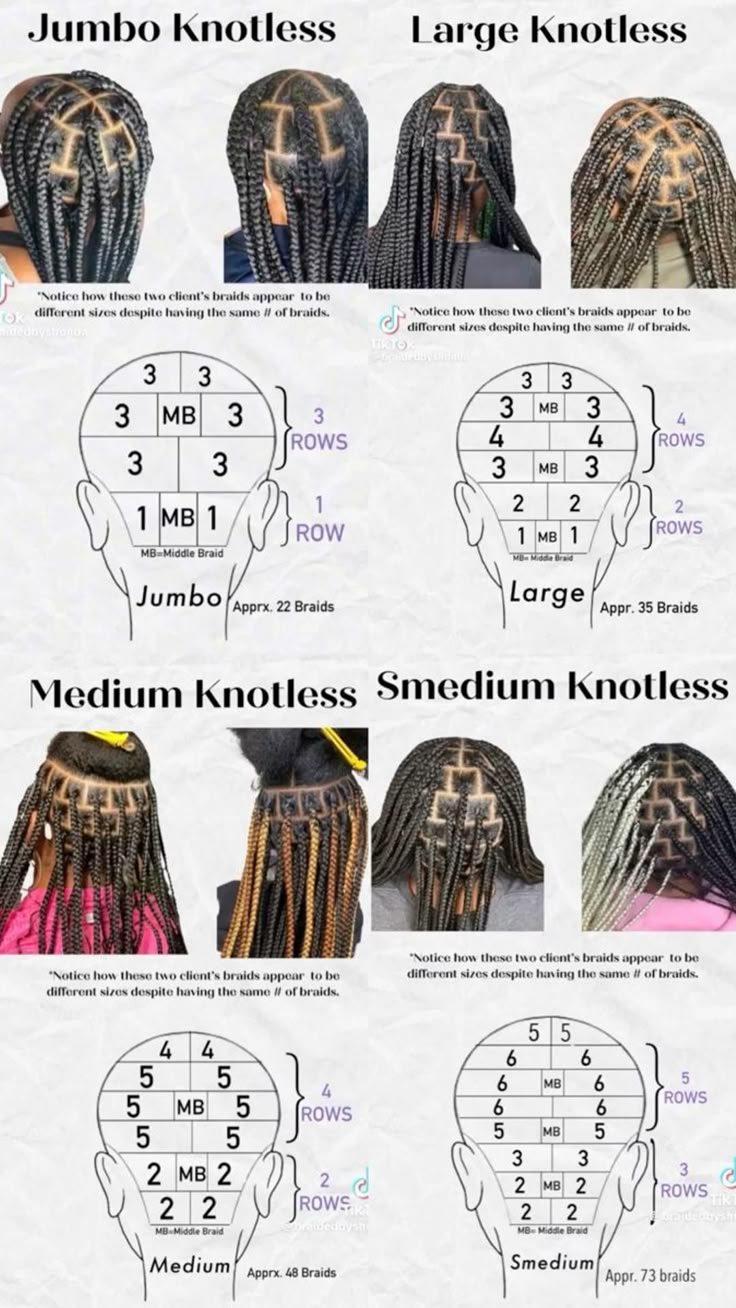
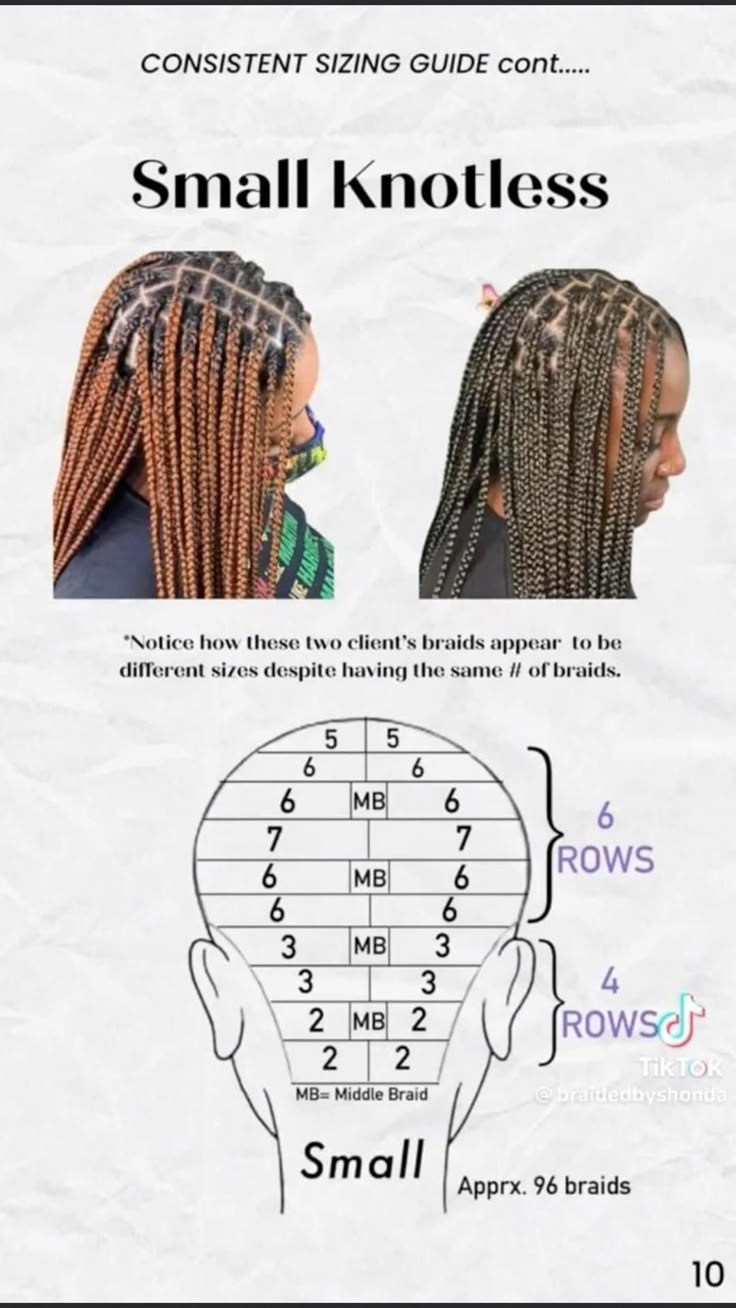
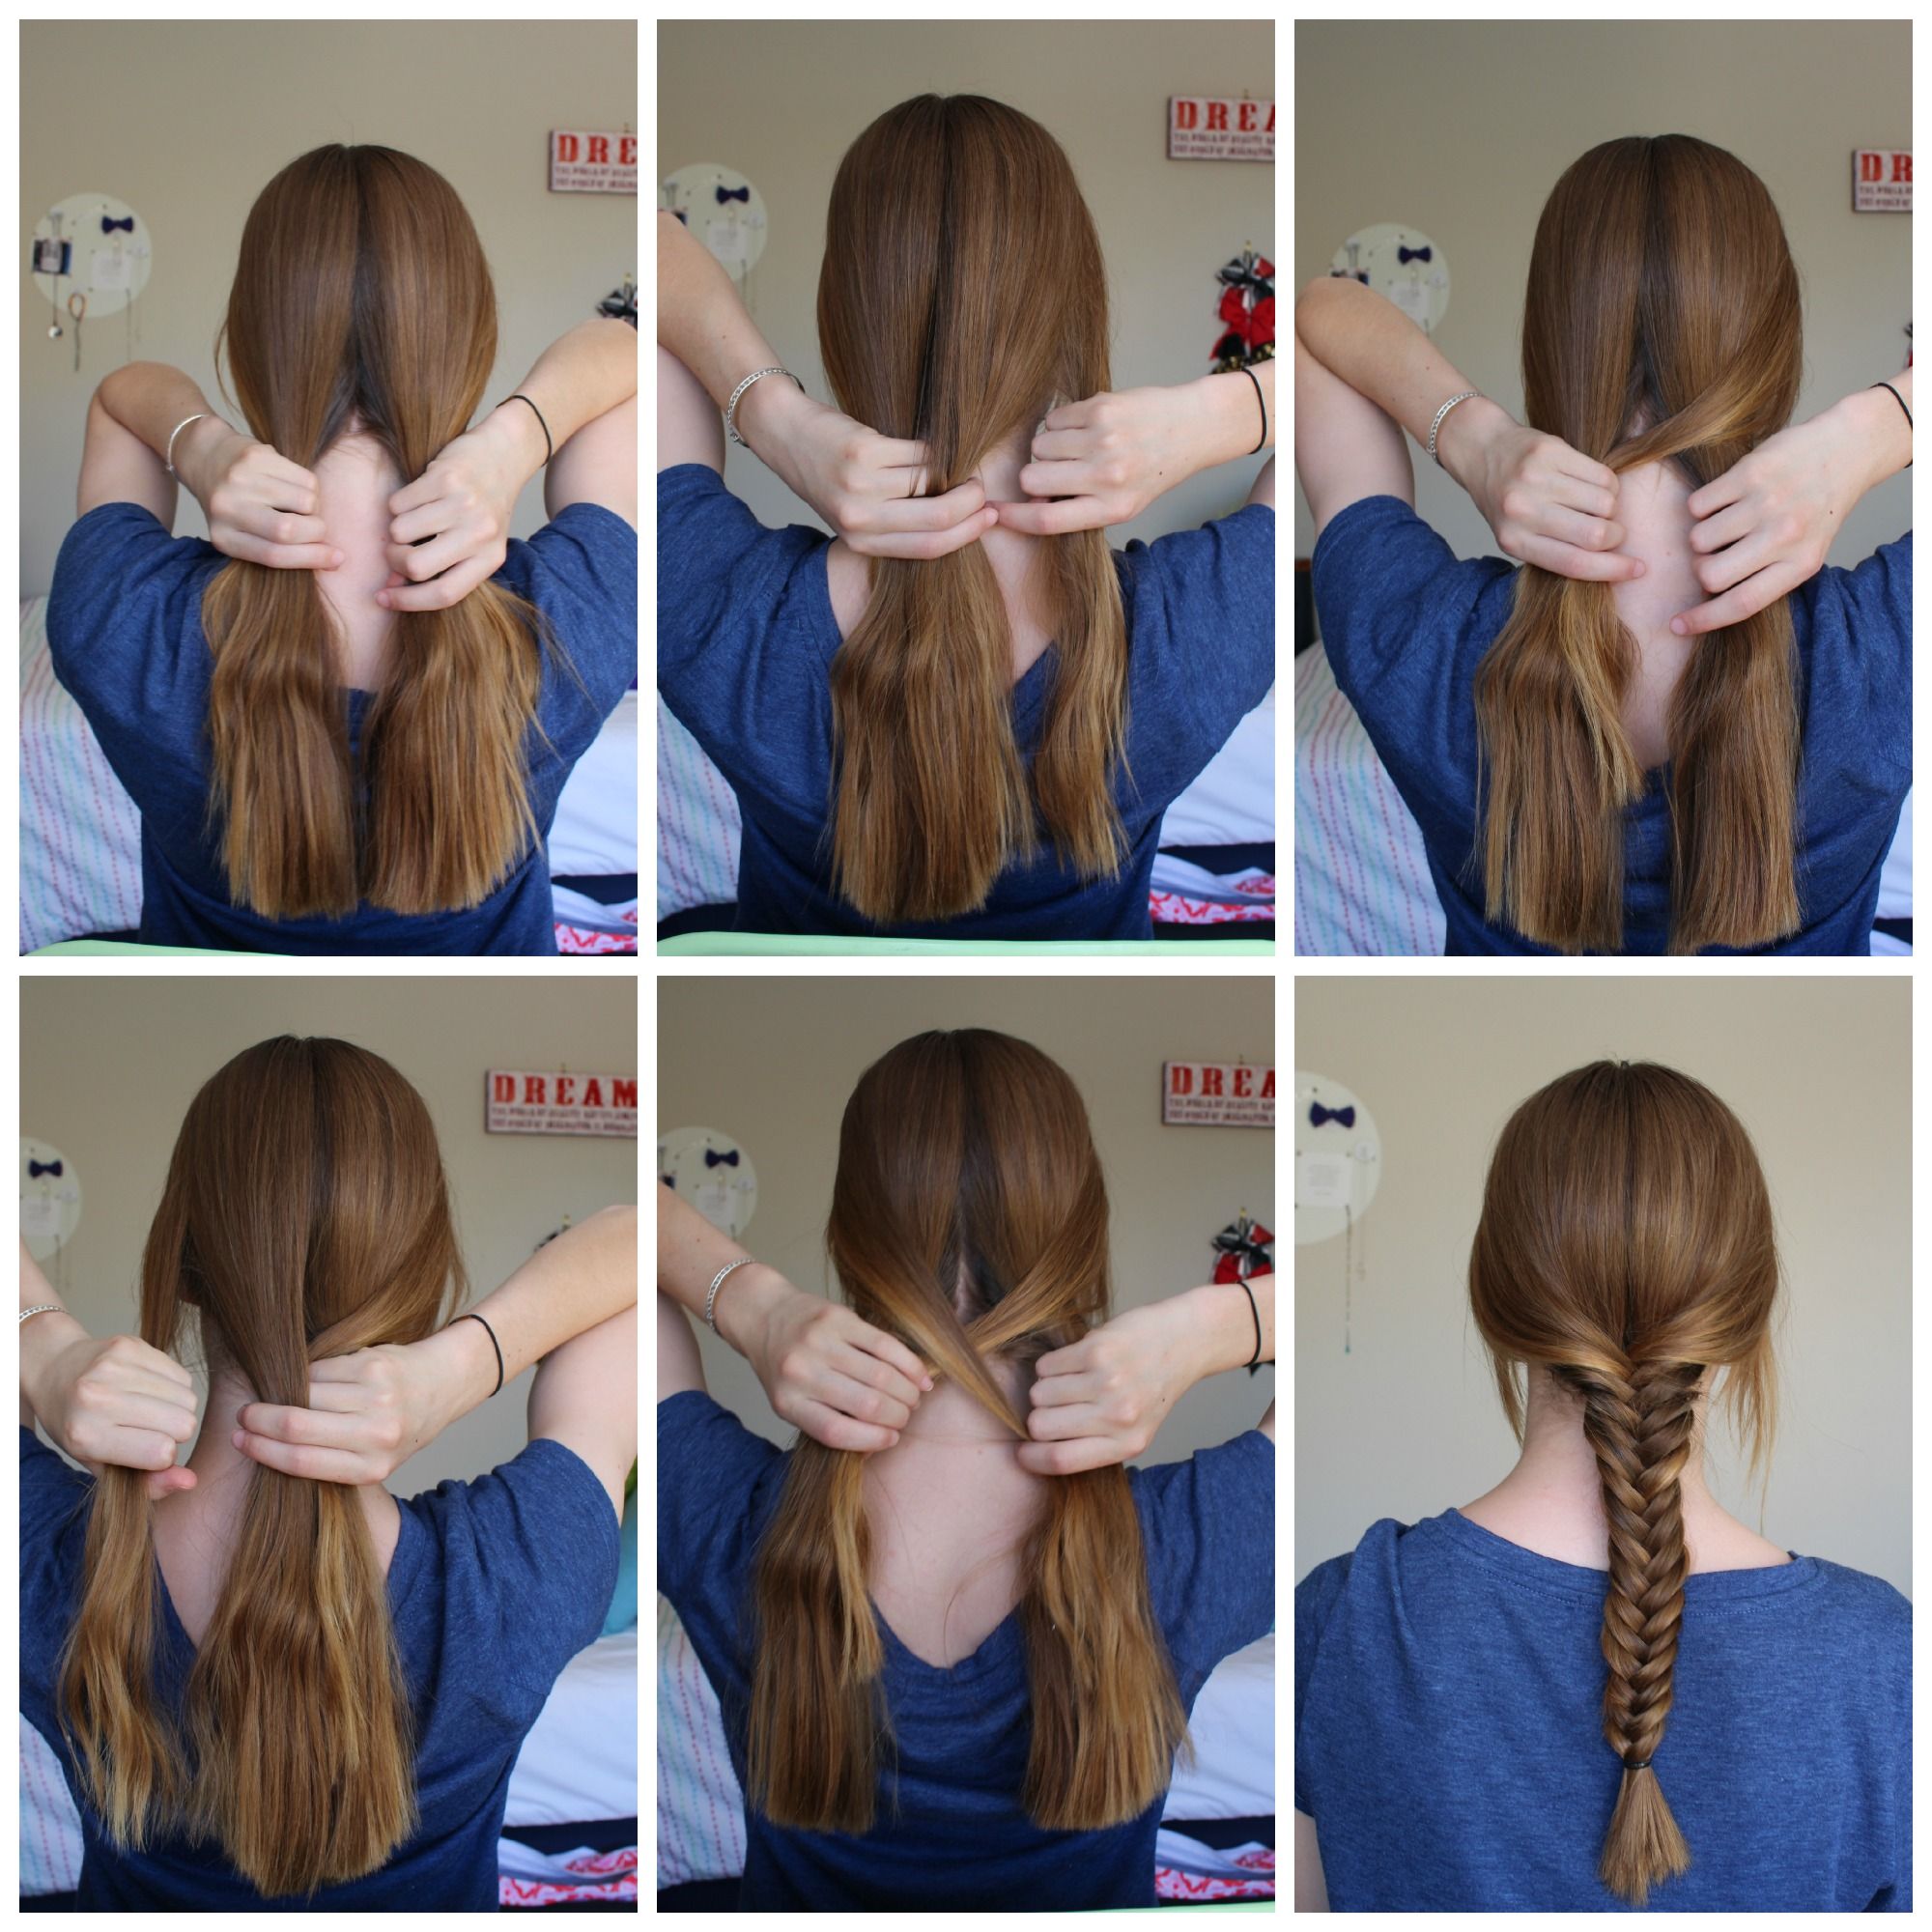
Your sections depend on what you’re braiding. Cornrows need skinny, precise parts. Box braids? Bigger, square-ish chunks. French braids? One big section to start, then you’ll add more as you go.
Here’s a quick cheat sheet:
| Braid Type | Section Shape | Section Size |
|---|---|---|
| Cornrows | Long, narrow strips | 0.5–1 inch wide |
| Box Braids | Squares or diamonds | 1–2 inches wide |
| French/Dutch Braids | One big top section | Varies by style |
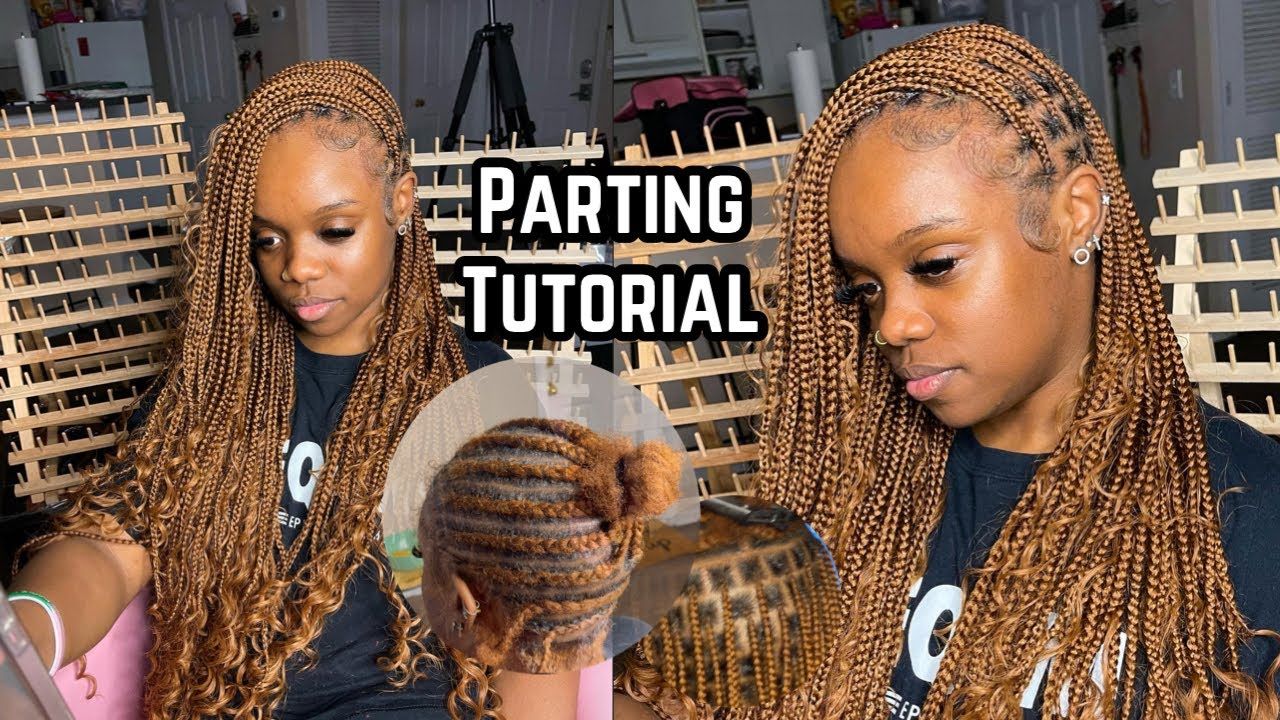
Step 3: Make Your First Part
Grab your rat-tail comb and start at the front of your head. For a middle part (think two braids or symmetrical cornrows), line the comb up with your nose and drag it straight back. For a side part, shift it an inch or two off-center—play around to see what flatters your face!
✔️ Hack: Use your fingernail to “pre-part” before the comb. It’s less intimidating if you’re new at this.
❌ Don’t: Press too hard. Your scalp will thank you.
Step 4: Divide and Conquer
Once you’ve got your main part, split the hair into smaller sections based on your style. Clip away the hair you’re not working on—trust me, loose strands are the enemy. For box braids, imagine a grid and part in straight lines. For cornrows, follow your scalp’s natural curve.
Real-life story: The first time I tried box braids, I didn’t clip anything. Hair was everywhere, and I ended up with a section shaped like a sad potato. Clips are your friends—use ‘em!
Step 5: Keep It Even
Eyeballing it works for some, but if you’re a perfectionist (or just bad at guessing like me), measure with your fingers. Two fingers = about 1 inch. Consistency is key—uneven sections throw off the whole vibe.
✔️ Pro move: Dab edge gel along each part as you go. It holds the hair in place and looks slick.
❌ Don’t: Rush this. Uneven sections = lumpy braids.
Step 6: Secure and Repeat
Once a section’s done, twist it or pop a mini elastic on the end to keep it separate. Move to the next section, working front to back or side to side—whatever feels natural. Take breaks if your arms get tired (braiding is a workout!).
Sectioning for Different Hair Types
Not all hair is created equal, and that’s a beautiful thing! Your texture and length change how you section. Here’s how to tweak the process for your unique locks.
Curly or Coily Hair (3A–4C)
Curls are gorgeous but tricky—knots love to hide in there. Stretch your hair slightly as you part to see the scalp clearly. Smaller sections (0.5–1 inch) work best for tight styles like cornrows.
✔️ Tip: Use a blow-dryer on low heat to stretch curls if they’re super shrinkage-prone.
❌ Don’t: Force big sections. You’ll end up with frizz city.
Straight or Wavy Hair (1A–2C)
Straight hair slips around a lot, so dampen it slightly for grip. You can get away with bigger sections (1–2 inches) since it’s less bulky.
✔️ Tip: Add a tiny bit of mousse for texture—makes parting a breeze.
❌ Don’t: Over-wet it. Soggy hair sticks together and ruins your lines.
Short Hair (Under 3 Inches)
Think short hair can’t braid? Think again! Section close to the scalp in tiny strips (0.5 inch max) for styles like micro braids or cornrows.
✔️ Hack: Use gel to “stick” short strands into place as you part.
❌ Don’t: Try chunky sections. They won’t hold.
Insider Secrets Most Tutorials Skip
Okay, here’s where we get juicy—stuff you won’t find in every basic “how to braid” article. These are the little tricks that take your sectioning from meh to whoa.
The Mirror Trick
If you’re braiding your own hair, two mirrors are better than one. Set a big one in front and hold a small one to check the back. I learned this after a cornrow attempt that looked like a zigzag gone wrong.
The Tension Test
Before you braid, tug gently on each section. If it feels loose or uneven, redo it. “Tension is everything,” says hairstylist Ndeye Anta Niang, a master braider with over 20 years of experience. “Even sections mean even pulls—no sore spots later.”
The Zigzag Hack
Want a cool twist? Instead of straight parts, try a zigzag pattern. Use the rat-tail comb to wiggle back and forth as you part. It’s perfect for cornrows or box braids and adds flair without extra work.
The Nighttime Prep
Section your hair the night before and sleep with loose twists. It saves time in the morning and lets your scalp “settle” into the parts. I started doing this after a 3-hour braiding sesh left me too tired to function.
Common Mistakes (And How to Fix ‘Em)
Even pros mess up sometimes—here’s what to watch out for and how to bounce back.
Mistake 1: Sections Too Big
Fix: Smaller is better. Redo with 1-inch max sections for control.
Why it happens: We get lazy or overestimate our hair’s thickness.
Mistake 2: Uneven Parts
Fix: Use a comb and check in a mirror. Re-part if it’s wonky.
Why it happens: Rushing or not looking from all angles.
Mistake 3: Ignoring Scalp Shape
Fix: Follow your head’s natural curves, especially for cornrows.
Why it happens: Forcing straight lines on a round scalp—ouch!
Level Up: Advanced Sectioning Techniques
Ready to flex your skills? These advanced moves add style and function to your braiding game.
The Brick-Layer Pattern
For box braids, offset your sections like bricks in a wall. Start the second row halfway between the first row’s parts. It hides the scalp better and looks pro-level sleek.
The Triangle Twist
Instead of squares, part into triangles for box braids. It’s artsy, modern, and surprisingly easy—just angle your comb differently. Bonus: it frames your face like a masterpiece.
The Diagonal Dream
For cornrows, try diagonal parts instead of straight back. Start at one temple and angle toward the opposite ear. It’s bold, unexpected, and turns heads.
How Sectioning Affects Braid Longevity
Ever wonder why some braids last a month while others fuzz out in a week? Sectioning’s the MVP here. Tight, even sections lock in the style—loose ones let it slip. A 2024 haircare survey by Hair Science Monthly found that 78% of people with long-lasting braids credited “consistent sectioning” as the key.
Quick Tips for Longevity:
- Use edge gel to seal parts.
- Braid to the very ends (no loose tips!).
- Sleep with a satin scarf—friction’s the enemy.
Braiding Hacks for Busy People
Life’s hectic, but your hair doesn’t have to suffer. Here’s how to section fast without sacrificing quality.
The Two-Hand Trick
Hold the comb in one hand and use the other to guide the hair. It’s like patting your head and rubbing your tummy—awkward at first, but a time-saver once you nail it.
The Pre-Section Shortcut
Part your hair into four big quadrants (front left, front right, back left, back right) and clip them. Then tackle one quadrant at a time. It’s less overwhelming and keeps you sane.
The Buddy System
“Sectioning is faster with help,” says stylist Ashleigh Marie, who’s braided hair for Austin’s top salons. Rope in a friend or sibling—split the work and chat while you’re at it.
Caring for Your Scalp During Sectioning
Your scalp’s the unsung hero of braiding, so treat it right. Dryness or irritation from rough parting can ruin the fun. Here’s how to keep it happy.
- Moisturize first: Rub in a light oil (like jojoba) before you start.
- Go gentle: Don’t scrape too hard with the comb—light pressure works.
- Post-braid TLC: Spritz with a water-and-aloe mix every few days to soothe.
Fun Facts to Impress Your Friends
Braiding’s got history, and sectioning’s been around forever. Drop these at your next hangout:
- Ancient Egyptians used sectioned braids to show status—tiny sections meant royalty!
- Cornrows were maps for enslaved people escaping in the 1800s—patterns hid directions.
- Today’s zigzag parts? Inspired by 90s hip-hop vibes.
Troubleshooting: What If It Goes Wrong?
Hair’s unpredictable—here’s how to fix common sectioning disasters.
- Lumpy sections: Unclip, detangle, and re-part smaller.
- Scalp showing: Add a zigzag or switch to brick-layer style.
- Arms tired: Take a 5-minute stretch break—your braids won’t mind.
Let’s Talk Trends: What’s Hot in 2025
Sectioning’s evolving, and 2025’s all about bold, creative parts. Think:
- Mixed sizes: Tiny sections up top, chunky ones below.
- Curved cornrows: Swirls and waves instead of straight lines.
- Color-coded sections: Dye each part a different shade before braiding—wild, right?
Your Turn: Make It Personal
Sectioning’s not one-size-fits-all. Play with it! Love symmetry? Stick to middle parts. Obsessed with asymmetry? Go wild with diagonals. “Find what feels like you,” says braiding expert Maya Jones. “That’s when it gets fun.”
Leave your comment
Related posts