Lace front wigs have gained immense popularity due to their natural appearance and versatility in styling. Ideal for anyone seeking a seamless hairline and undetectable fit, these wigs offer the illusion that hair is growing from your own scalp. This guide will walk you through the steps of properly installing a lace front wig, ensuring a natural look and secure fit.

Tools and Materials Needed
Before beginning the wig installation process, ensure you have the following items:
- Lace front wig
- Wig cap
- Scissors (for trimming the lace)
- Wig adhesive (tape or glue)
- Hair clips
- Comb
- Alcohol wipes (for cleaning the skin)
- Makeup brush (optional, for applying powder)
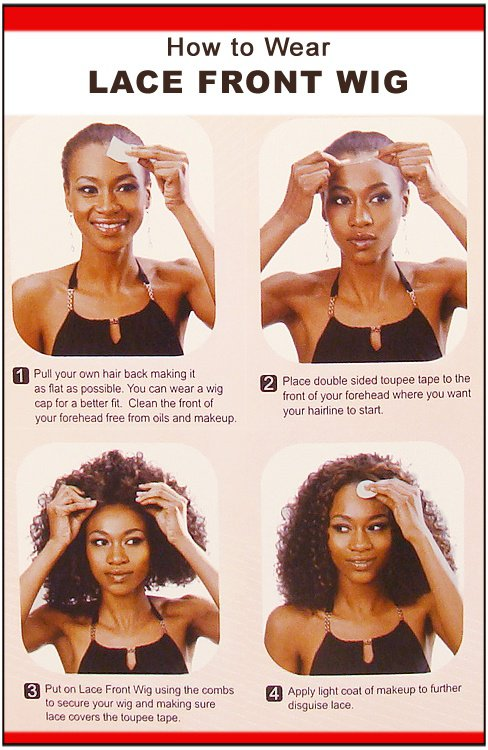
Step 1: Preparing Your Natural Hair
A. Cleaning and Drying Your Hair Start by thoroughly cleaning your hair and scalp to remove any oils and buildup. Dry your hair completely.
B. Flattening Your Hair For short hair, a simple brushing is adequate. For longer hair, braid your hair into cornrows or flatten it with gel and a tight wig cap to create a smooth surface.
Step 2: Preparing the Skin and Wig
A. Skin Preparation Clean the forehead area with alcohol wipes to remove oil, which will help the wig adhesive stick better.
B. Wig Preparation Unpack your wig and gently shake it to loosen up the fibers. If the lace extends beyond the hairline, trim the excess lace with scissors, leaving about 1/8th inch for a more natural transition.
Step 3: Wearing the Wig Cap
A. Positioning the Wig Cap Position the wig cap on your head, covering all of your natural hair. Make sure it sits comfortably and covers all hair, adjusting as needed.
Step 4: Applying the Wig
A. Applying Adhesive Apply a thin layer of wig adhesive along your hairline, ensuring it’s even. Wait a few minutes for the adhesive to become tacky.
B. Placing the Wig Carefully align the lace front wig with your natural hairline. Press the lace into the adhesive, starting from the center of the forehead and working your way outwards.
C. Securing the Wig Once the wig is placed, press down along the edges of the lace to secure it into the adhesive. Use hair clips to hold the wig in place as the adhesive sets.
Step 5: Styling and Maintenance
A. Styling the Wig Once the wig is securely attached, you can style it as desired. Use a comb or your fingers to adjust the parting and style the hair.
B. Maintenance Regular maintenance is crucial to keep your wig looking fresh. Clean the lace and hair regularly, and store the wig on a mannequin head to maintain its shape.

Enjoy Your New Look!
Putting on a lace front wig may seem daunting at first, but with practice, it becomes an easy part of your beauty routine. These wigs offer versatility and a natural look that can boost your confidence and style. Enjoy experimenting with different styles and colors!
By following these detailed steps, you ensure that your lace front wig is applied correctly and comfortably, enhancing your overall appearance with a natural-looking hairline.
Leave your comment
Related posts