How to Part Hair for Braids: Your Ultimate Guide to Nailing the Perfect Look
Hey there, braid lovers! If you’ve ever struggled with parting your hair for braids—or ended up with a lopsided style that just didn’t vibe—this guide is for you. Parting might seem like a small step, but it’s the secret sauce that can make or break your braid game. Whether you’re going for sleek cornrows, chunky box braids, or a cute French braid, how you section your hair sets the tone for everything. And trust me, I’ve been there—staring in the mirror, comb in hand, wondering why my parts look more like a zigzag rollercoaster than a clean line.
In this article, we’re diving deep into the art of parting hair for braids. I’ll spill some tricks I’ve picked up over the years (including a few quirky ones you won’t find anywhere else), break down the steps for different braid styles, and throw in some fresh ideas to make your look stand out. Plus, we’ll cover everything from tools to techniques, face shapes to hair types, and even how to fix those sneaky flyaways. Ready to level up? Let’s get started!
Why Parting Hair for Braids Matters More Than You Think
Parting isn’t just about splitting your hair—it’s about creating a roadmap for your braids. A clean, intentional part can make your style look polished and professional, while a messy one can leave you with uneven braids or a scalp that’s screaming for mercy. Think of it like building a house: you wouldn’t slap bricks together without a solid foundation, right? Same deal here.
But here’s something cool: parting is also a chance to show off your personality. Ever tried a zigzag part just because it felt fun? I did once for a school dance, and people couldn’t stop talking about it. It’s those little quirks that make your braids yours. Plus, good parting can save you time and keep your style lasting longer—less redoing means more time to binge your favorite show.
The Hidden Perks of Perfect Parting
- Symmetry: Even parts make your braids look balanced and neat.
- Comfort: No awkward tugging or tight spots on your scalp.
- Durability: Well-sectioned hair holds braids better, especially for protective styles.
- Style Boost: Creative parts (like triangles or diamonds) add flair without extra effort.
So, how do you get it right? Let’s break it down.
Tools You’ll Need to Part Hair Like a Pro
Before we jump into techniques, let’s talk gear. You don’t need a fancy kit, but having the right tools can turn a hair-parting struggle into a breeze. Here’s what I keep in my braid stash—and a few surprises you might not have thought of.
Must-Have Tools
- Rat-Tail Comb: The skinny end is perfect for precise lines. Plastic ones are cheap, but metal ones last forever.
- Wide-Tooth Comb: Great for detangling before you start parting.
- Hair Clips or Bands: Keeps sections out of your way—trust me, loose hair is a chaos magnet.
- Mirror: A handheld one works best so you can check every angle.
- Edge Control Gel: Smooths flyaways and keeps parts crisp.
Secret Weapons (Shh, Don’t Tell!)
- Chopstick: Yep, the kind from your takeout. It’s my go-to for super-fine parts when my comb’s too bulky.
- Dry Shampoo: Spritz it on oily roots to make hair less slippery—easier to section!
- Bobby Pins: Pin down tricky sections while you work.
Pro tip: I once used a pencil in a pinch when I couldn’t find my comb. Worked like a charm! Keep an open mind—sometimes the best tools are hiding in plain sight.
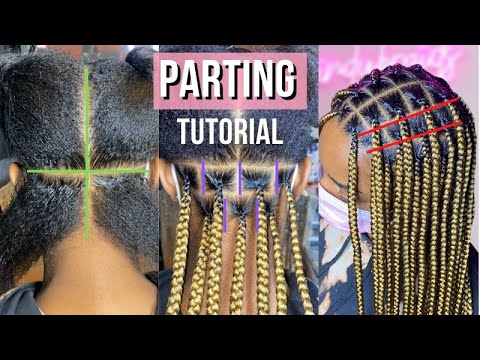
Step-by-Step: How to Part Hair for Different Braid Styles
Every braid style has its own vibe, and the parting changes with it. Let’s walk through the big ones—cornrows, box braids, and French braids—with easy steps you can follow at home. I’ll toss in some hacks I’ve learned from trial and error, too.
Parting for Cornrows
Cornrows are all about straight, tight lines close to the scalp. They’re my fave for summer because they stay put no matter how much I sweat.
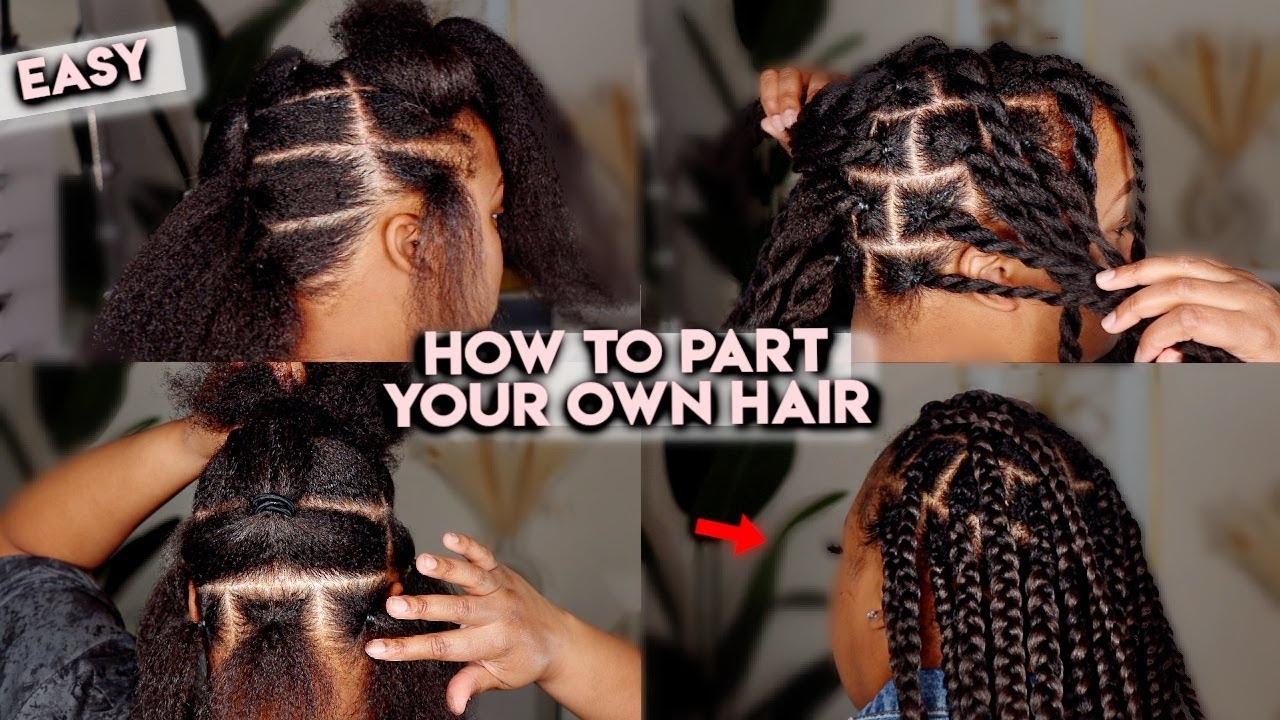
Steps to Nail It
- Detangle First: Use a wide-tooth comb to get rid of knots. Wet hair with a spray bottle if it’s extra tangly.
- Start Small: Grab a 1-inch section at your hairline (forehead or nape, depending on direction).
- Draw the Line: Use the rat-tail comb to make a straight part from front to back or side to side. Press firm but gentle—no scalp scratches!
- Clip the Rest: Secure the unsectioned hair with clips so it doesn’t sneak into your part.
- Repeat: Keep sections even—about ½ to 1 inch wide—moving across your head.
Hacks
- Zigzag Twist: For fun, angle your comb in a slight zigzag every few inches. It’s subtle but edgy.
- Gel It: Dab edge control along the part before braiding to lock it in place.
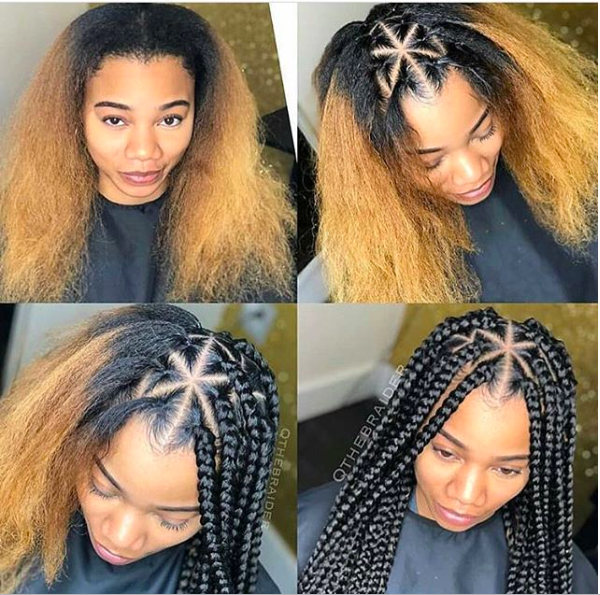
Parting for Box Braids
Box braids are chunky and bold, so your parts need to be clean and square (or diamond-shaped if you’re feeling fancy).
Steps to Nail It
- Prep Your Hair: Blow-dry or air-dry after washing for smooth strands.
- Middle or Side? Decide your base part—middle for symmetry, side for drama.
- Section Big: Use your comb to split hair into four large chunks (front left, front right, back left, back right). Clip them up.
- Go Small: Within each chunk, part 1-2 inch squares or triangles. Consistency is key!
- Check Angles: Hold your mirror to make sure parts line up from all sides.
Hacks
- Bricklayer Style: Offset each row like bricks for a pro look—less scalp shows through.
- Mark It: Use a washable marker (like for kids) to sketch parts on your scalp if you’re new at this.
Parting for French Braids
French braids are flowy and elegant, starting at the crown and working down. I love them for lazy days—they hide messy roots like magic.
Steps to Nail It
- Smooth It Out: Brush hair back from your forehead to remove bumps.
- Top Section: Part a 2-3 inch rectangle at the crown, from temple to temple.
- Side Lines: Comb straight lines down each side to frame the section. Clip the rest back.
- Adjust as You Go: Add hair to your braid as you move down—no need for more parts yet!
- Finish Clean: Tie off the end with a cute scrunchie.
Hacks
- Double Up: Part two sections side by side for twin French braids—adorable and sporty.
- Tilt It: Angle the part slightly off-center for a modern twist.
Matching Your Part to Your Face Shape
Did you know your face shape can change how a braid part looks? I figured this out after years of wondering why middle parts made me look like a surprised owl. Here’s a quick guide to flatter your features.
| Face Shape | Best Part | Why It Works |
|---|---|---|
| Oval | Middle or Side | Balances your length and width perfectly. |
| Round | Deep Side | Adds height, slimming your face a bit. |
| Square | Soft Zigzag | Softens sharp angles with playful lines. |
| Heart | Off-Center | Draws attention down, away from a wide brow. |
My Experiment
I’ve got a heart-shaped face, so I tried an off-center part with cornrows last month. Total game-changer—my cheekbones popped, and my forehead didn’t steal the show. Play around in front of the mirror to find your sweet spot!
Hair Type Tips: Parting for Curly, Straight, or Coily Hair
Your hair’s texture changes how you part—and how your braids turn out. Here’s what I’ve learned from my curly friends, straight-haired sister, and my own coily strands.
Curly Hair
- Challenge: Curls can hide parts or tangle mid-section.
- Fix: Stretch hair with a blow-dryer on low heat before parting. Use gel for definition.
- Science Bit: A 2022 study from the Journal of Cosmetic Science found stretched curly hair holds braids 20% longer than unstretched.
Straight Hair
- Challenge: Slippery strands slip out of parts.
- Fix: Lightly mist with water or dry shampoo for grip. Avoid over-brushing—it flattens too much.
- Quirk: My sister swears by teasing her roots first for extra hold.
Coily Hair
- Challenge: Tight coils make clean lines tricky.
- Fix: Work in small sections and use a leave-in conditioner to soften. Patience is your BFF here.
- Expert Tip: “For coily hair, parting while damp keeps shrinkage at bay,” says hairstylist Niani B, who teaches braiding workshops.
Creative Parting Ideas to Steal the Show
Why stick to straight lines when you can get artsy? These ideas are straight from my hair diary—perfect for when you want compliments without saying a word.
Zigzag Parts
- How: Angle your comb back and forth every inch as you part.
- Vibe: Playful and retro—think ‘90s kid energy.
- Best For: Cornrows or two big braids.
Diamond Parts
- How: Create tiny diamond shapes with your comb between box braids.
- Vibe: Bold and geometric—great for Instagram pics.
- Hack: Practice on a doll head first (I snagged one from a craft store).
Curved Parts
- How: Sweep your comb in a gentle arc from forehead to nape.
- Vibe: Soft and whimsical—pairs with French braids like a dream.
- Fun Fact: I did this for a beach trip, and the breeze made it look even cooler.
Common Parting Mistakes (And How to Fix Them)
We’ve all messed up a part—uneven lines, sore scalps, you name it. Here’s how to dodge the drama.
❌ Mistake: Parting Too Tight
- Problem: Hurts your scalp and pulls hair out.
- Fix: Ease up on pressure. If it stings, you’re overdoing it.
- Science: A 2023 study in Dermatology Today linked tight braiding to 15% more hair breakage.
❌ Mistake: Uneven Sections
- Problem: Braids look lumpy or lopsided.
- Fix: Measure with your fingers—two finger-widths per section is a safe bet.
- Hack: Redo just the wonky part, not the whole thing.
❌ Mistake: Ignoring Flyaways
- Problem: Messy edges ruin the clean look.
- Fix: Brush on edge control with a toothbrush for precision.
Keeping Your Parts Fresh: Maintenance Tips
Once your braids are in, don’t let your parts get fuzzy. Here’s how to keep them popping for weeks.
✔️ Moisturize: Spray a water-and-oil mix on your scalp daily—dry hair frays parts.
✔️ Wrap It Up: Sleep with a satin scarf to stop friction. I’ve got a leopard-print one that’s my lucky charm!
✔️ Touch Up: Dab gel on parts every few days to tame new growth.
✔️ Cleanse: Use a cotton pad with witch hazel to wipe your scalp—keeps it fresh without unbraiding.
“Maintenance is half the battle with braids,” says stylist Laura Dale. “A little care goes a long way.”

Parting for Kids vs. Adults: What’s Different?
Braiding for little ones (or yourself as a grown-up) isn’t the same. I’ve braided my niece’s hair tons, and here’s what I’ve noticed.
For Kids
- Gentler Touch: Their scalps are sensitive—use less tension.
- Smaller Sections: Easier to manage wiggly heads.
- Fun Shapes: Star or heart parts keep them excited.
For Adults
- Bolder Choices: Go for intricate designs—adults can sit still longer.
- Thicker Sections: Saves time for busy schedules.
- Layer Play: Add extensions or mix textures for drama.
Bonus: Parting With Extensions
Adding extensions? Parting gets a twist. I tried this for a festival look last year—here’s the scoop.
- Clip In First: Secure extensions under your top layer for fullness.
- Blend Parts: Match extension parts to your natural hairlines.
- Hide the Tracks: Angle parts to cover clip-ins—no one will know!
“Extensions need seamless parting to look natural,” says braiding pro Sarah Potempa. It’s all about camouflage.
Let’s Chat: What’s Your Parting Style?
Phew, we’ve covered a lot! Now it’s your turn. What’s your go-to parting trick? Ever tried something wild like a spiral part? Drop a comment below—I’d love to hear your stories or answer your questions. And if this guide helped, share it with a friend who’s still parting with a fork (kidding, but you get it). Let’s keep the braid love going!
Leave your comment
Related posts