How to Part Hair for Box Braids: Your Ultimate Guide to Perfect Prep
Hey there! If you’re reading this, you’re probably ready to dive into the world of box braids—or maybe you’re just curious about how to make them look flawless. Either way, you’re in the right place! Box braids are more than just a hairstyle; they’re a vibe, a statement, and a way to protect your natural hair while looking amazing. But here’s the secret sauce that a lot of people overlook: how you part your hair can make or break the whole look. Trust me, I’ve been there—messy parts can turn a cute style into a hot mess real quick!
In this guide, we’re going to unpack everything you need to know about parting your hair for box braids. We’ll cover the basics, spill some insider tips (stuff even your bestie might not know!), and give you step-by-step advice to get those crisp, clean lines. Plus, I’ll throw in some fun facts and hacks that’ll make you the go-to braid guru among your friends. Let’s get started!
Why Parting Matters More Than You Think
Okay, let’s kick things off with a truth bomb: parting isn’t just about dividing your hair—it’s the foundation of your entire box braid game. Think of it like building a house. You wouldn’t slap bricks together without a solid base, right? Same deal here. A good part sets the tone for neat, even braids that last longer and look polished.
But here’s something wild: did you know that the way you part can actually affect your scalp health? Yep! Uneven or sloppy sections can pull too hard on some spots, leading to tension and even breakage. A study from the Journal of Clinical and Aesthetic Dermatology found that improper braiding techniques—like uneven parting—can contribute to traction alopecia over time. Crazy, right? So, let’s nail this parting thing and keep your hair happy.
What Fans Want to Know
You might be wondering, “Why should I care so much about this?” Well, beyond the practical stuff, parting is where you can flex your personality! Are you a symmetry queen who loves perfect squares, or do you vibe with funky triangle parts? Your parting style says a lot about you—and trust me, your followers or friends will notice.
Tools You’ll Need to Part Like a Pro
Before we dive into the how-to, let’s talk tools. You don’t need a fancy kit, but having the right gear makes a huge difference. Here’s what I swear by:
- Rat-tail comb: That skinny end is your BFF for precise lines.
- Wide-tooth comb: Perfect for detangling before you start.
- Hair clips: Keeps sections out of your way (because no one likes a hair tornado).
- Edge control gel: Smooths flyaways and makes parts pop.
- Mirror: A handheld one works if you’re doing this solo.
- Spray bottle with water: Keeps hair damp and manageable.
Pro tip: I keep a little stash of colorful clips because they make the process feel fun—like I’m playing hair salon with myself. What’s your go-to hair accessory? Let’s make this personal!
Prepping Your Hair: The Step Before the Step
Alright, before you even touch that comb, your hair needs some love. Parting works best on clean, stretched hair—it’s like giving your braids a smooth canvas to shine. Here’s how to prep:
Step 1: Wash and Condition
Start with a clarifying shampoo to get rid of buildup, then follow with a deep conditioner. Why? Conditioned hair is softer and easier to part without snagging. I’m obsessed with this mango-scented conditioner I found—it’s like a tropical vacation for my scalp!
Step 2: Detangle
Grab that wide-tooth comb and gently work through knots. Start from the ends and move up to the roots. Wet hair with a little water or leave-in conditioner if it’s super curly—this cuts down on breakage.
Step 3: Stretch It Out
Blow-dry your hair on low heat with a comb attachment, or let it air-dry in big twists overnight. Stretched hair shows your parts better and makes braiding a breeze. Fun fact: I used to skip this step and ended up with wiggly parts—lesson learned!
Basic Parting Styles: Squares, Triangles, and More
Now, let’s get to the fun part (pun intended)! There are tons of ways to part for box braids, and each gives a different vibe. Here’s a breakdown of the classics:
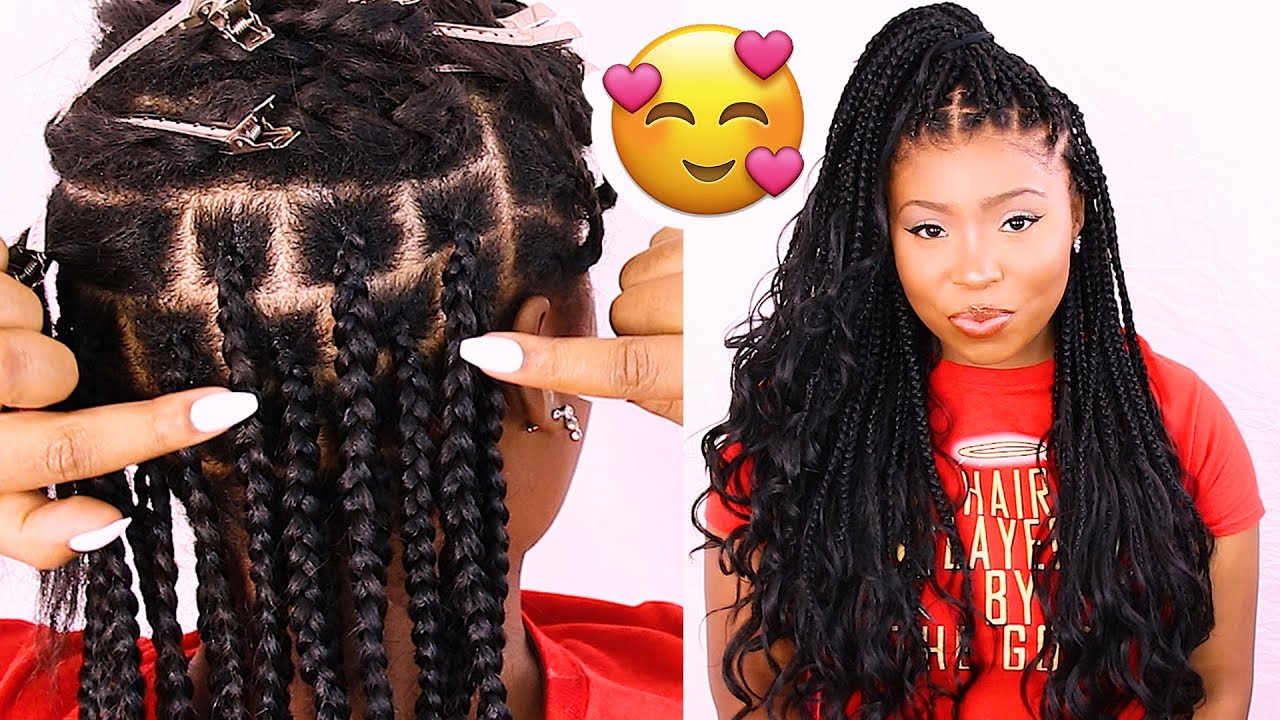
Square Parts
- What it is: The OG box braid style—think perfect little boxes all over your scalp.
- Why it’s dope: Super neat and symmetrical; great for beginners.
- How to do it:
- Divide your hair into four big sections (front left, front right, back left, back right) with clips.
- Start at the back and use your rat-tail comb to make a horizontal line about 1 inch wide.
- Cross that with vertical lines to form 1-inch squares.
- Clip away the rest and repeat!
✔️ Pro move: Use a tiny dab of gel along each line for razor-sharp edges.
❌ Don’t: Make sections too small if your hair’s short—it’ll slip out.
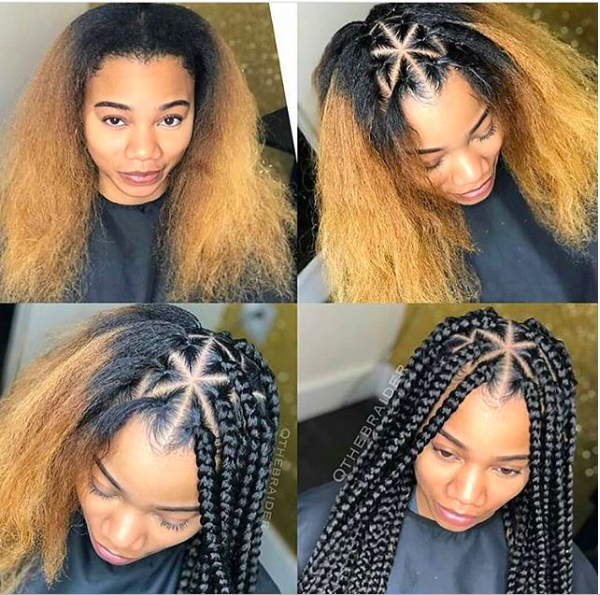
Triangle Parts
- What it is: Sections shaped like triangles instead of squares.
- Why it’s dope: Adds a funky, free-flowing look—perfect if you’re artsy.
- How to do it:
- Split your hair down the middle.
- At the back, make a diagonal line from one side to the center.
- Mirror it on the other side to form a triangle base.
- Keep going row by row up to the top.
✔️ Pro move: Alternate the direction of the diagonals for a zigzag effect.
❌ Don’t: Rush it—uneven triangles look messy.
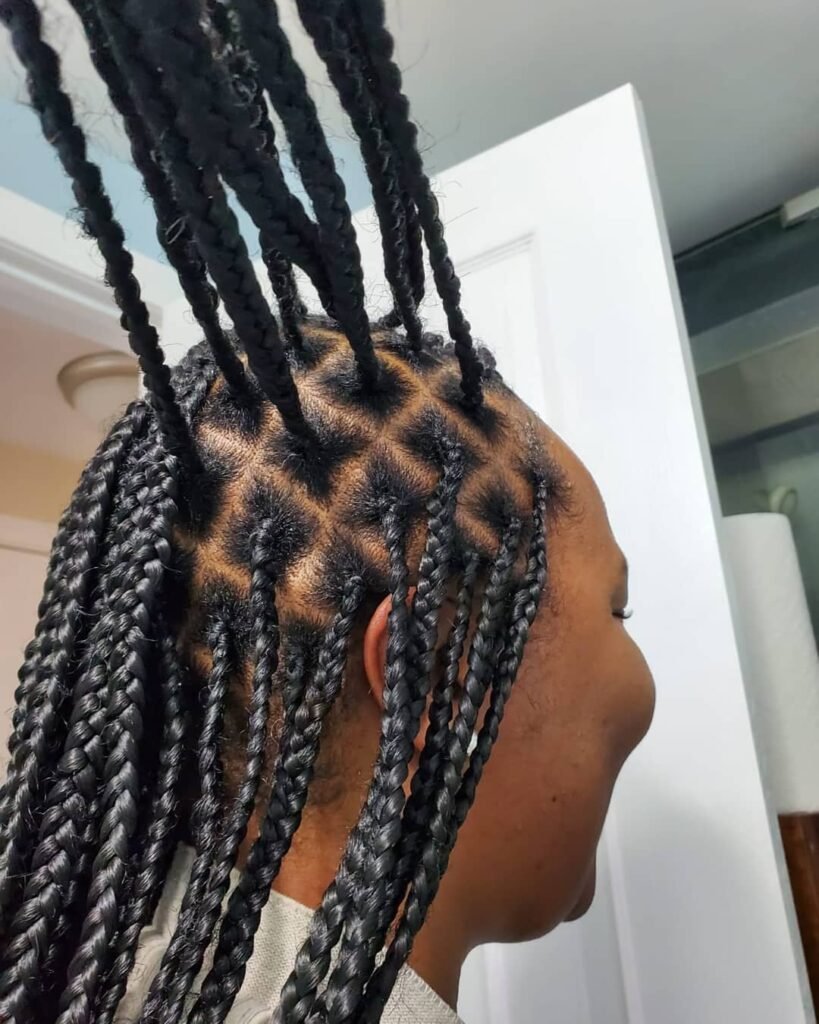
Diamond Parts
- What it is: A twist on squares, with diagonal lines forming diamonds.
- Why it’s dope: Fancy and eye-catching without being too wild.
- How to do it:
- Start with a middle part.
- Make diagonal lines slanting left, then right, to connect into diamond shapes.
- Adjust sizes based on how big you want your braids.
✔️ Pro move: Use a mirror to check symmetry from all angles.
❌ Don’t: Overlap lines—it’ll confuse your pattern.
Insider Secrets Fans Will Love
Okay, here’s where we spill some tea! These are the little-known tricks that’ll make your parting game next-level—and give you some fun stories to share.
The “Lipstick Hack”
Ever struggle to keep parts straight? Grab an old lipstick (one you don’t use anymore) and lightly trace your lines on your scalp before combing. It washes out easy but keeps you on track. I tried this with a neon pink shade once—felt like a hair artist!
Parting With Music
I’ve got a confession: I can’t part without my playlist. Something about a good beat keeps my hands steady. Studies show music can lower stress and boost focus—maybe that’s why my parts are cleaner when Beyoncé’s on!
The Scalp Massage Bonus
Before you start, give your scalp a quick 5-minute massage with coconut oil. It’s relaxing, boosts blood flow (good for hair growth!), and makes parting feel like self-care. My friends tease me for turning braid prep into a spa day, but it works!
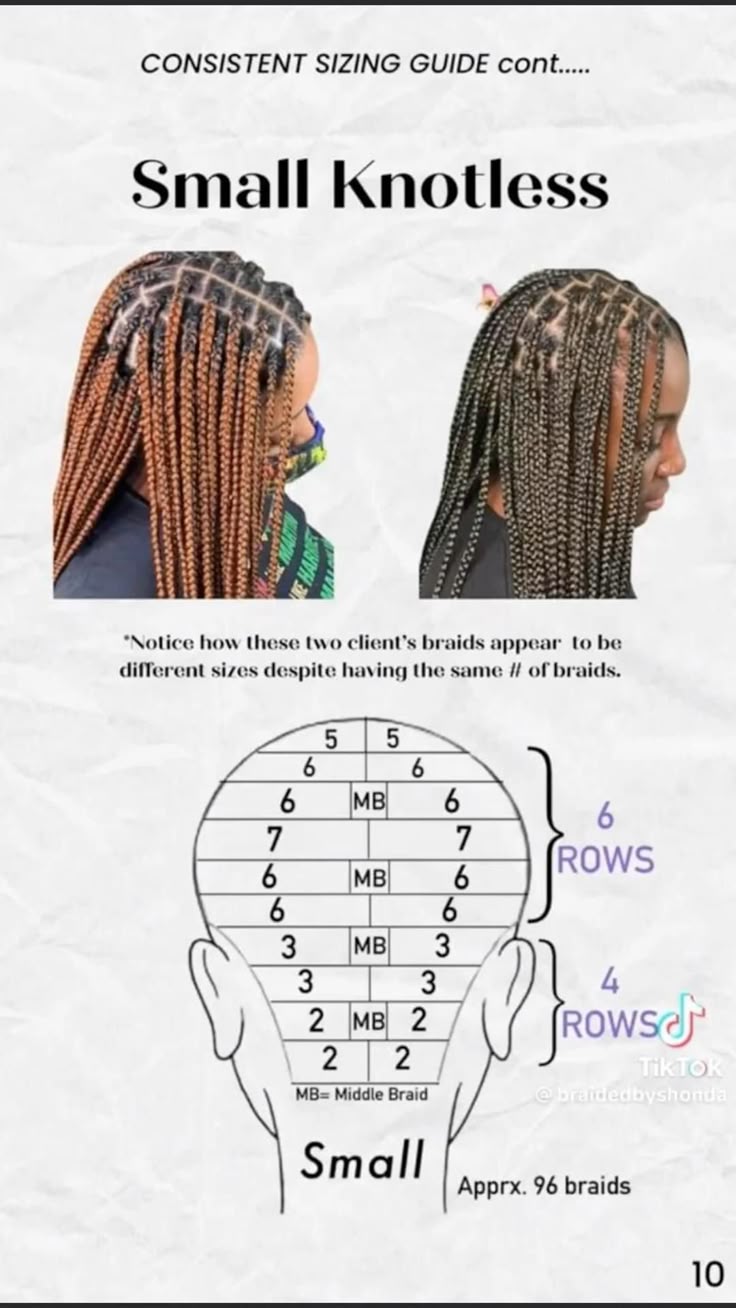
Size Matters: Small, Medium, or Jumbo?
The size of your parts decides how thick your braids will be—and how long they’ll take. Let’s break it down:
| Part Size | Braid Thickness | Time to Braid | Best For |
|---|---|---|---|
| Small (½ inch) | Thin, micro braids | 8-12 hours | Detailed styles |
| Medium (1 inch) | Classic box braids | 5-8 hours | Everyday wear |
| Jumbo (2+ inches) | Thick, chunky braids | 3-5 hours | Quick installs, bold looks |
What Fans Ask About
“How do I pick the right size?” Easy—think about your vibe and schedule. Love intricate looks and got time? Go small. Need something fast for a weekend trip? Jumbo’s your jam. I once did jumbo braids for a beach vacay—took 4 hours and lasted the whole trip!
Advanced Parting Techniques You Haven’t Heard Of
Ready to level up? These styles are less common but totally doable with practice. They’re perfect for standing out!
Zigzag Parts
- What it is: Wavy, zigzag lines instead of straight ones.
- Why it’s dope: Playful and unique—great for kids or quirky vibes.
- How to do it:
- Start with a straight horizontal line.
- Use your comb to zigzag across it (think tiny “M” shapes).
- Section off squares or triangles from there.
C-Shaped Parts
- What it is: Curved lines forming half-circles.
- Why it’s dope: Softens the look and works great for big braids.
- How to do it:
- Part your hair in half.
- Draw a small “C” shape with your comb at the back.
- Connect it to the next “C” in a row.
Spiderweb Parts
- What it is: A mix of box braids and cornrows radiating from the center.
- Why it’s dope: Complex and artsy—total showstopper.
- How to do it:
- Start at the crown and make a small circle.
- Radiate straight lines outward like spokes.
- Fill in with square or triangle parts.
Expert hairstylist Niani B says, “Creative parting is where you can really show your personality. Don’t be afraid to experiment!” She’s so right—my spiderweb try took forever, but the compliments? Worth it.
Common Mistakes (And How to Fix ‘Em)
Even pros mess up sometimes! Here’s what to watch out for:
Mistake #1: Uneven Sections
- Why it happens: Rushing or not using a mirror.
- Fix it: Double-check each row with a handheld mirror. Adjust as you go.
Mistake #2: Too-Tight Parts
- Why it happens: Pulling too hard on the comb.
- Fix it: Keep your grip light. If it hurts, you’re overdoing it.
Mistake #3: Skipping Prep
- Why it happens: Impatience (been there!).
- Fix it: Don’t braid on dirty or tangled hair—parts won’t stay clean.
Parting for Different Hair Types
Not all hair parts the same—here’s how to tweak it for your texture:
Curly (3A-3C)
- Challenge: Tight curls hide parts.
- Solution: Stretch with a blow-dryer first. Use more gel for definition.
Coily (4A-4C)
- Challenge: Dense hair tangles fast.
- Solution: Work in smaller sections. Keep it damp with a spray bottle.
Straight or Wavy (1-2C)
- Challenge: Slippery strands shift.
- Solution: Add a bit of mousse for grip before parting.
How to Maintain Perfect Parts After Braiding
Once your braids are in, those parts still need love. Here’s how to keep them fresh:
- Sleep smart: Use a silk bonnet or pillowcase to avoid frizz.
- Touch up edges: Dab gel on a toothbrush to smooth flyaways.
- Cleanse gently: Use a diluted shampoo mix in a spray bottle weekly.
Hairstylist Bridgette Hill shares, “Maintaining your parts keeps the style looking intentional. It’s all about the details.” She’s spot-on—little tweaks make a big difference.
Fun Ways to Switch Up Your Parts Later
Bored of your look? You can tweak your parts without re-braiding:
- Side sweep: Pull braids to one side and pin for a new vibe.
- Half-up: Twist the top section into a bun, leaving the bottom loose.
- Zigzag redo: Use gel to draw a zigzag over your original parts.
I once turned my square parts into a faux side part for a party—took 10 minutes and got tons of “oohs”!
The Science Behind Parting and Hair Health
Let’s geek out for a sec. Research shows that consistent tension from bad parting can weaken hair follicles. A 2018 study in Clinical Cosmetic and Investigative Dermatology linked tight styles to scalp inflammation. But here’s the good news: clean, even parts distribute tension better, reducing stress on your roots. So, parting right isn’t just cute—it’s science-backed self-care!
Your Parting Cheat Sheet: Step-by-Step Guide
Ready to try it? Here’s a foolproof plan for classic square parts:
- Wash and stretch: Clean hair, blow-dry or twist-dry.
- Section off: Divide into four big chunks with clips.
- Start small: At the nape, make a 1-inch horizontal line.
- Square it up: Add vertical lines to form boxes.
- Clip and repeat: Work row by row up to the top.
- Polish it: Smooth edges with gel.
Time it: 30-60 minutes, depending on your hair length. Take breaks if your arms get tired—I blast music to keep going!
What’s Your Parting Personality?
Here’s a fun twist: your parting style might say something about you! I made this little quiz based on vibes I’ve noticed:
- Squares: You’re organized and love routine.
- Triangles: You’re creative and a little wild.
- Zigzags: You’re playful and don’t take life too seriously.
What’s your pick? I’m a triangle girl—love that artsy edge!
Bonus: Parting Hacks for Solo Braiders
Doing your own hair? These tricks save the day:
- Two mirrors: Use one in front and one behind to see everything.
- Pre-section: Part all your hair first, then braid later—less chaos.
- Finger comb: If your comb slips, use your fingers to rough out lines.
I learned the hard way that solo parting takes patience—spilled tea on my lap once from juggling too much!
Let’s Talk Trends: What’s Hot in 2025
As of March 2025, parting styles are evolving. Curved parts are popping up on TikTok, and jumbo braids with zigzag lines are huge on Insta. Celebrity stylist Ursula Stephen says, “This year, it’s all about blending structure with freedom—think clean bases with playful twists.” Keep an eye out—I’m testing a curved part next!
Wrap-Up: Your Parting Journey Starts Here
Whew, we covered a lot! From squares to spiderwebs, you’ve got the tools, tricks, and inspo to part your hair like a pro for box braids. Whether you’re chilling at home or flexing for the ‘gram, those crisp lines will have you feeling unstoppable. Remember: it’s not just about the braids—it’s about the confidence you rock them with.
Let’s Chat!
What’s your favorite parting style? Got a hack I missed? Drop it in the comments—I’m dying to hear your stories! And if you try these tips, tag me on socials—I’d love to see your masterpiece. Happy braiding, fam!
Leave your comment
Related posts