Are you ready to rock a lace front wig and make it look as natural as possible? Whether you’re new to wigs or just need some tips to perfect your technique, this guide is for you. We’ll walk through every step to ensure your wig blends seamlessly with your hairline, giving you that flawless look. Let’s dive in!
Part 1: Positioning Your Wig
Step 1: Decide on a Wig Cap
Do you want a barrier between your scalp and the wig? A wig cap can hold down your natural hair and create a smooth surface for the wig. It’s like a stocking cap that keeps everything in place. If you use one, line it up just behind where you want your wig’s hairline to be. Some wigs come with built-in caps, so check yours first.
Step 2: Align Your Wig
Place the wig on your head and pull the lace down over your forehead to get the hairline in the right spot. Make sure it looks natural from all angles. Adjust any straps inside the wig so it fits snugly but comfortably—not too tight or loose.
Step 3: Secure with Freeze Spray
To keep the wig in place, use a freeze spray along the hairline. Lift the lace front and spray your hairline, getting as close to your scalp as possible without spraying your forehead. The spray will feel cold, but it’s super effective.
Step 4: Blow-Dry to Set
Use a blow dryer on medium or low heat to dry the freeze spray, moving it back and forth over your hairline. Press the lace down as you dry to ensure it sticks well. Avoid using high heat to prevent burning your scalp.
Part 2: Cutting and Melting the Lace
Step 1: Apply a Wrap Strip
Wrap a strip around your hairline for at least 10 minutes. This thin, stretchy strip helps hold the wig in place while the lace melts into your hairline. Tie it at the nape of your neck and use this time to do your makeup or relax.
Step 2: Remove the Wrap Strip
Carefully cut through the wrap strip and remove it. Check if the wig’s hairline is sticking to your scalp. If it lifts up, repeat the freeze spray step and use a bit more product this time.
Step 3: Trim Excess Lace
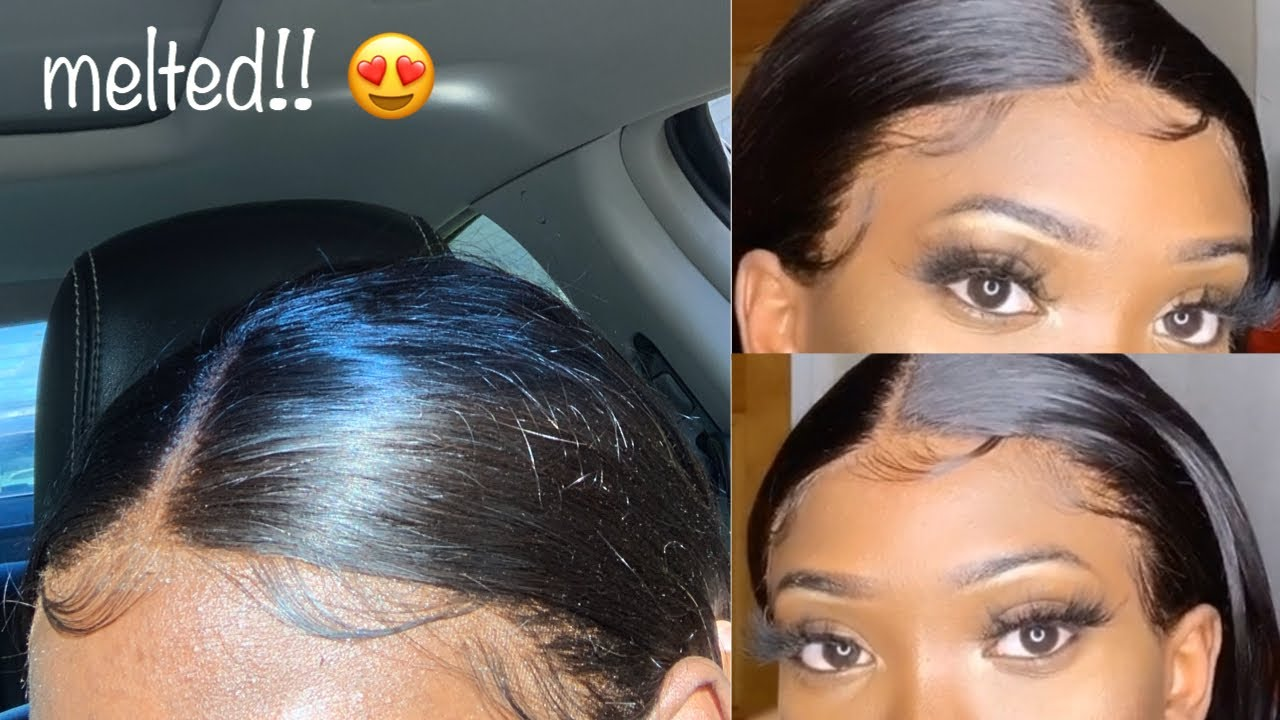
Use fine scissors to trim away the excess lace in a zigzag pattern. This creates a more natural hairline. Keep trimming until you’ve removed as much lace as possible. Some tiny sections might still stick up, but we’ll handle those next.
Step 4: Apply Gel for a Perfect Finish
Using a pin-tail comb, apply a small amount of hair gel along the edges of the lace. Press the gel down to flatten the lace against your scalp. Work around the entire hairline, reapplying gel as needed.
Step 5: Dry the Gel
Set your hair dryer to medium or low heat and dry the gel. Check the tackiness with your finger—if it’s still sticky, keep drying until it’s smooth and dry to the touch.
Part 3: Finishing the Look
Step 1: Clean Up Excess Gel
Use a damp towel to gently wipe away any visible gel around your hairline. Brush downward to avoid messing up your wig.
Step 2: Create Baby Hairs for a Natural Look
Use an eyebrow razor to trim a few hairs along the hairline to about half an inch long. Apply a bit of gel and style these baby hairs with an eyebrow brush. This can add a realistic touch to your wig.
Step 3: Blend with Makeup
If the lace doesn’t match your skin tone perfectly, use makeup to blend it. Apply a little foundation or powder along the hairline and blend it well. Check the parting too—apply makeup there if needed to match your scalp.
Step 4: Use a Hot Comb for Sleekness
If your wig is too voluminous, use a hot comb on medium heat to flatten it. Run the comb over small sections along your part, pressing the hair down towards your scalp. This gives a sleek, natural look.
Personal Story
I remember the first time I tried applying a lace front wig. It felt like such a challenge to get everything perfect. But with practice, I learned the tricks to make it look seamless. Now, applying a wig feels like second nature, and I love experimenting with different styles. It’s all about finding what works for you and having fun with it.
Conclusion
Applying a lace front wig can seem daunting at first, but with these steps, you’ll have it looking natural in no time. Remember, practice makes perfect. Don’t be afraid to experiment and find your own techniques. Happy styling!
How to Melt the Lace on a Wig: 7 Essential FAQs
1. What does “melting the lace” even mean?
“Melting the lace” sounds pretty intense, right? But don’t worry, it’s not about actual melting with heat. It just means making the lace of your wig blend seamlessly with your scalp so it looks natural and invisible. Think of it like a magic trick for your hairline!
2. What products do I need to melt the lace?
You’ll need a few key items: freeze spray (to hold the lace in place), a blow dryer (to set the spray), wrap strips (to press the lace down), hair gel (to secure the edges), and a fine pair of scissors (to trim the excess lace). You can find most of these at your local beauty supply store or online.
3. How do I start the process?
First, position your wig on your head and line up the hairline where you want it. Lift the lace and spray your hairline with freeze spray. Be ready for a cold blast! Then, use your blow dryer on medium heat to dry the spray, pressing the lace down as you go.
4. How do I use wrap strips?
Wrap strips are thin, stretchy strips that help hold the lace down while it “melts” into your scalp. Once you’ve applied the freeze spray and blow-dried it, place a wrap strip around your hairline. Leave it on for at least 10 minutes. This is a great time to relax, do your makeup, or pick out an outfit!
5. What’s the best way to trim the lace?
After removing the wrap strip, use fine scissors to trim the excess lace. Cut in a zigzag pattern to create a more natural hairline. Go slow and steady—it’s better to trim too little than too much. If you see small sections of lace sticking up, don’t worry—we’ll handle those next.
6. How do I secure the edges of the lace?
Take a small amount of hair gel on the tip of a pin-tail comb and apply it along the edges of the lace. Press the gel down to flatten the lace against your scalp. This helps secure any tiny bits of lace that are still visible. Then, use your blow dryer again to set the gel.
7. How do I clean up and finish the look?
Once the lace is secured and dry, use a damp towel to wipe away any visible gel around your hairline. For an extra natural look, you can create baby hairs using an eyebrow razor and a bit of gel. Finally, blend the lace with your skin using a little makeup, and use a hot comb if you need to flatten any parts of the wig.
Leave your comment
Related posts