How to Draw Braided Hair: A Step-by-Step Guide to Mastering the Art
Braids are everywhere—on red carpets, in school hallways, and even in your favorite animated movies. They’re timeless, versatile, and oh-so-cool. But if you’ve ever tried to draw braided hair, you know it’s not as simple as it looks. Those twists and turns can feel like a puzzle, right? Don’t worry—I’ve got you covered! This guide is packed with tips, tricks, and secrets to help you draw braided hair like a pro. Whether you’re sketching for fun, creating a comic, or just doodling in your notebook, you’ll walk away with skills that’ll impress your friends (and maybe even yourself!).
I’ve dug deep into what makes braids tick—beyond the basic “over-under” technique. We’ll explore everything from the texture of the hair to the way light hits it, plus some quirky details most people overlook. Did you know, for instance, that braids can tell a story about someone’s personality? Or that the tightness of a braid changes how it looks on paper? Let’s dive in and unlock the magic of drawing braided hair together!
Why Drawing Braided Hair Feels Tricky (And How to Fix It)
Braided hair isn’t just a hairstyle—it’s a mini work of art. The way the strands weave together can stump even seasoned artists. A lot of folks struggle because they focus too much on the details right away, like every tiny hair, instead of the big picture. Others mess up the pattern, making it look flat or fake. Sound familiar? Here’s why it happens and how to get past it.
The Brain Loves Patterns—But Hates Chaos
Your brain naturally looks for repetition, like the crisscross of a braid. But real hair isn’t perfect—it’s messy, with flyaways and uneven sections. That mix of order and chaos trips people up. The fix? Start simple. Think of a braid as three big ropes twisting together, not a million little strands.
Perspective Plays a Huge Role
Ever notice how a braid looks different from the side versus straight-on? That’s perspective at work. If you don’t adjust for the angle, your drawing can end up looking like a weird ladder instead of a braid. We’ll tackle this with easy steps later.
Texture Is Sneaky
Hair isn’t smooth like plastic—it’s got bumps, waves, and personality. A lot of beginners forget that, so their braids look like stiff tubes. The secret? Add texture with light, sketchy lines to show the hair’s natural flow.
Quick Tip to Start Strong
- ✔️ Do this: Sketch a loose guideline (like a curvy line) where the braid will go before adding details.
- ❌ Avoid this: Jumping straight into the weave pattern without a plan—it’s a recipe for frustration.
The Basics: Understanding How Braids Actually Work
Before you put pencil to paper, let’s break down what a braid is. Knowing this will make your drawings pop with realism. Picture three friends holding hands and dancing in a circle—that’s kinda how braids happen!
What Makes a Braid a Braid?
A classic three-strand braid (the one most people think of) is made by taking three sections of hair and crossing them over each other. Left over middle, right over middle, repeat. It’s like a game of leapfrog with hair! But here’s a fun fact: the tighter the braid, the sharper the edges. Looser braids look softer and more relaxed—great for showing a character’s vibe.
Real-Life Inspiration
Next time you’re out, sneak a peek at someone’s braid. Notice how it’s thicker at the top and tapers down? Or how some strands stick out like little rebels? Those details are gold for your art. I once saw a girl with a braid so messy it looked like a bird’s nest—perfect for a wild, carefree character sketch!
Braid Anatomy Cheat Sheet
| Part of the Braid | What It Does | Drawing Tip |
|---|---|---|
| Top (Base) | Where it starts, usually widest | Use bold lines to show volume |
| Middle | The weaving happens here | Overlap sections clearly |
| End (Tail) | Thins out, often tied off | Add a scruffy tie or loose hairs |
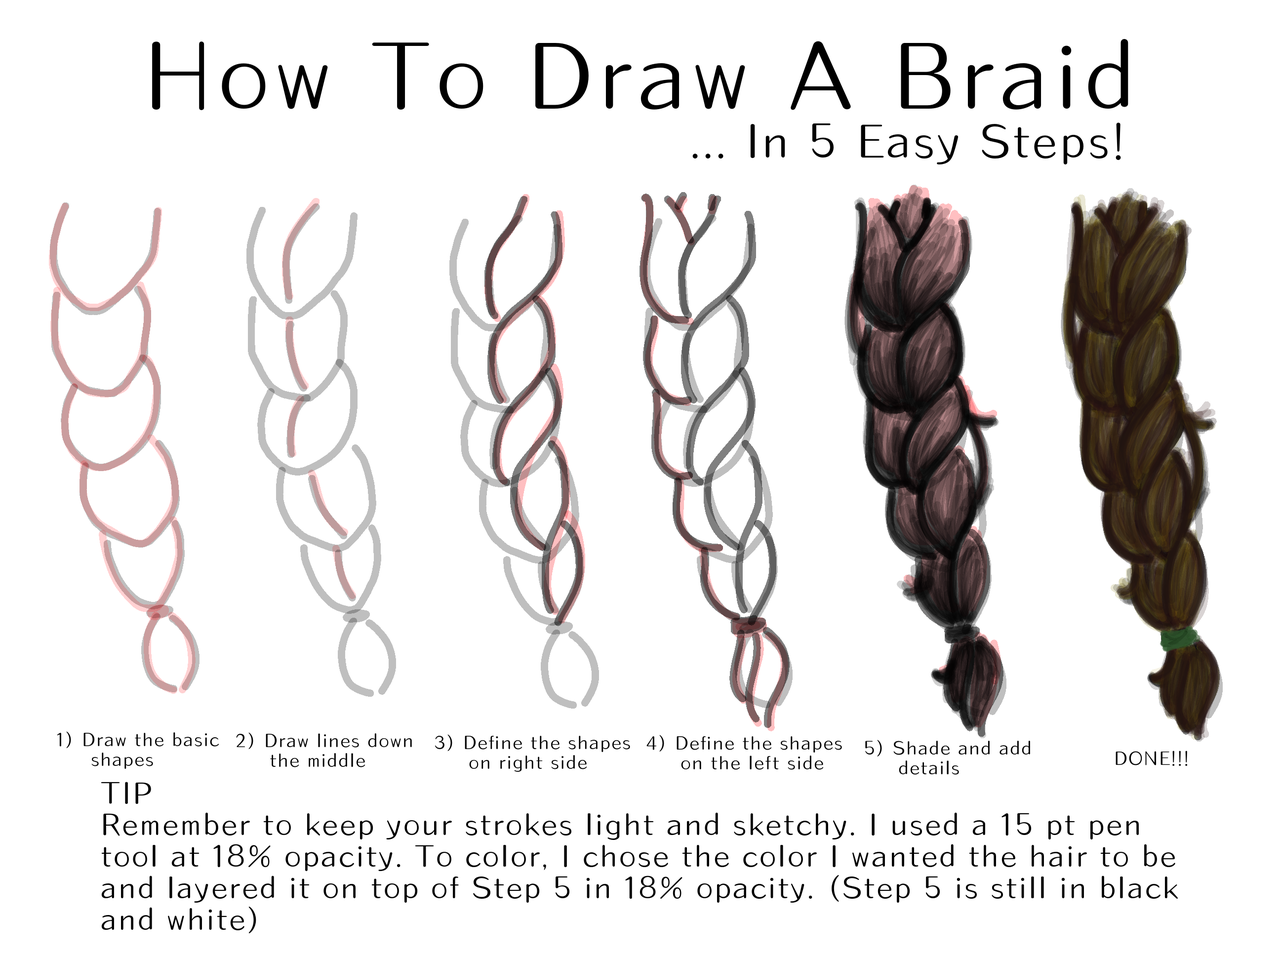
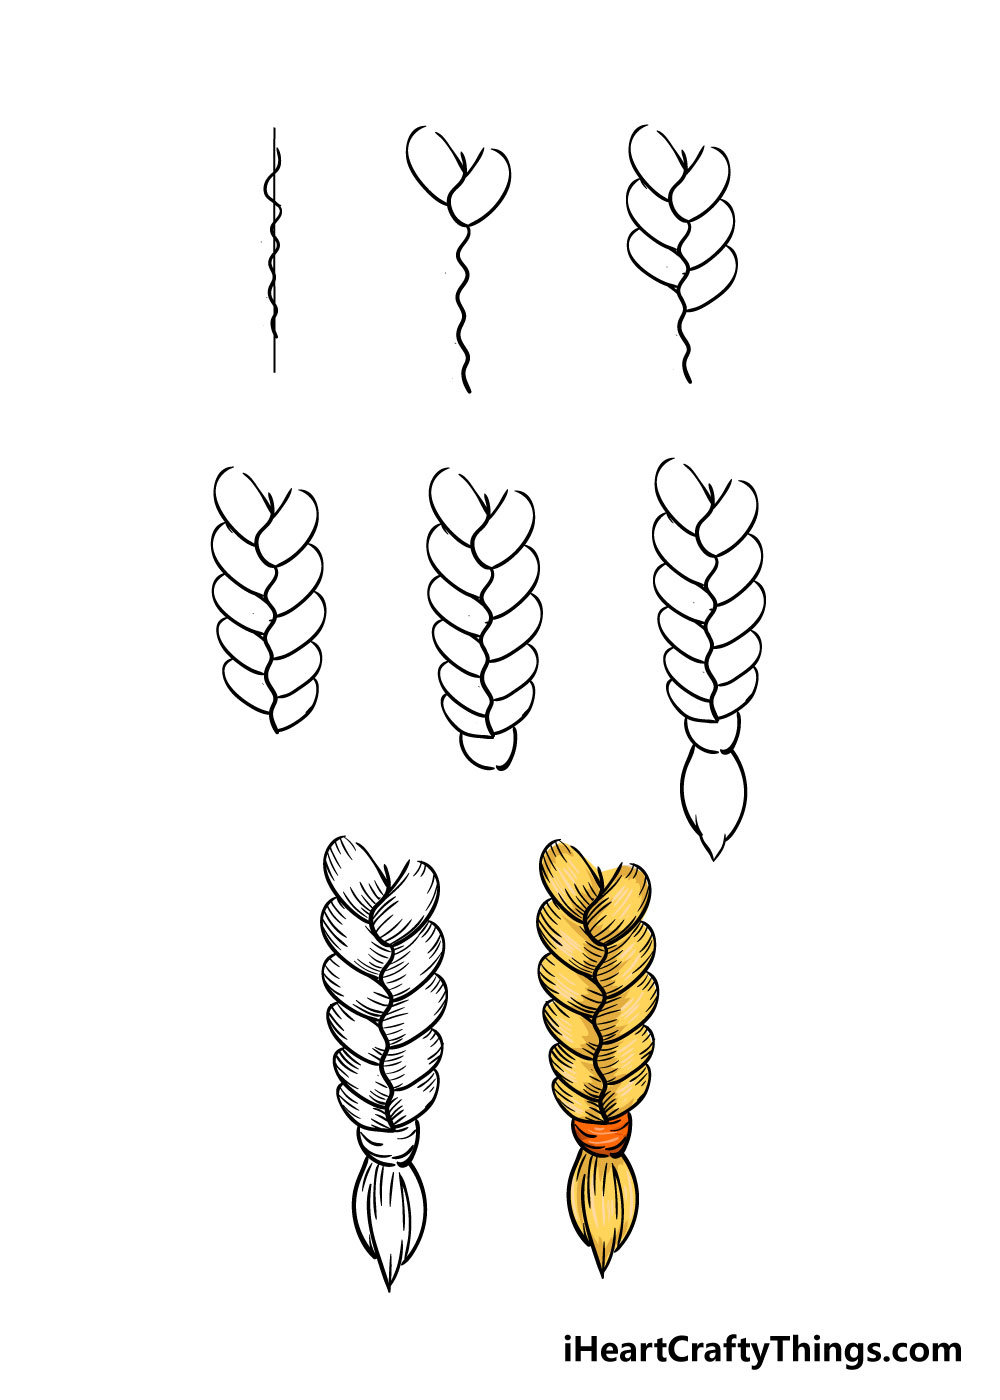
Step-by-Step: How to Draw a Three-Strand Braid
Alright, let’s get to the good stuff—actually drawing! Grab your pencil, paper, and maybe a snack (drawing’s more fun with cookies). This is the classic braid everyone loves, and I’ll walk you through it like we’re sketching together.
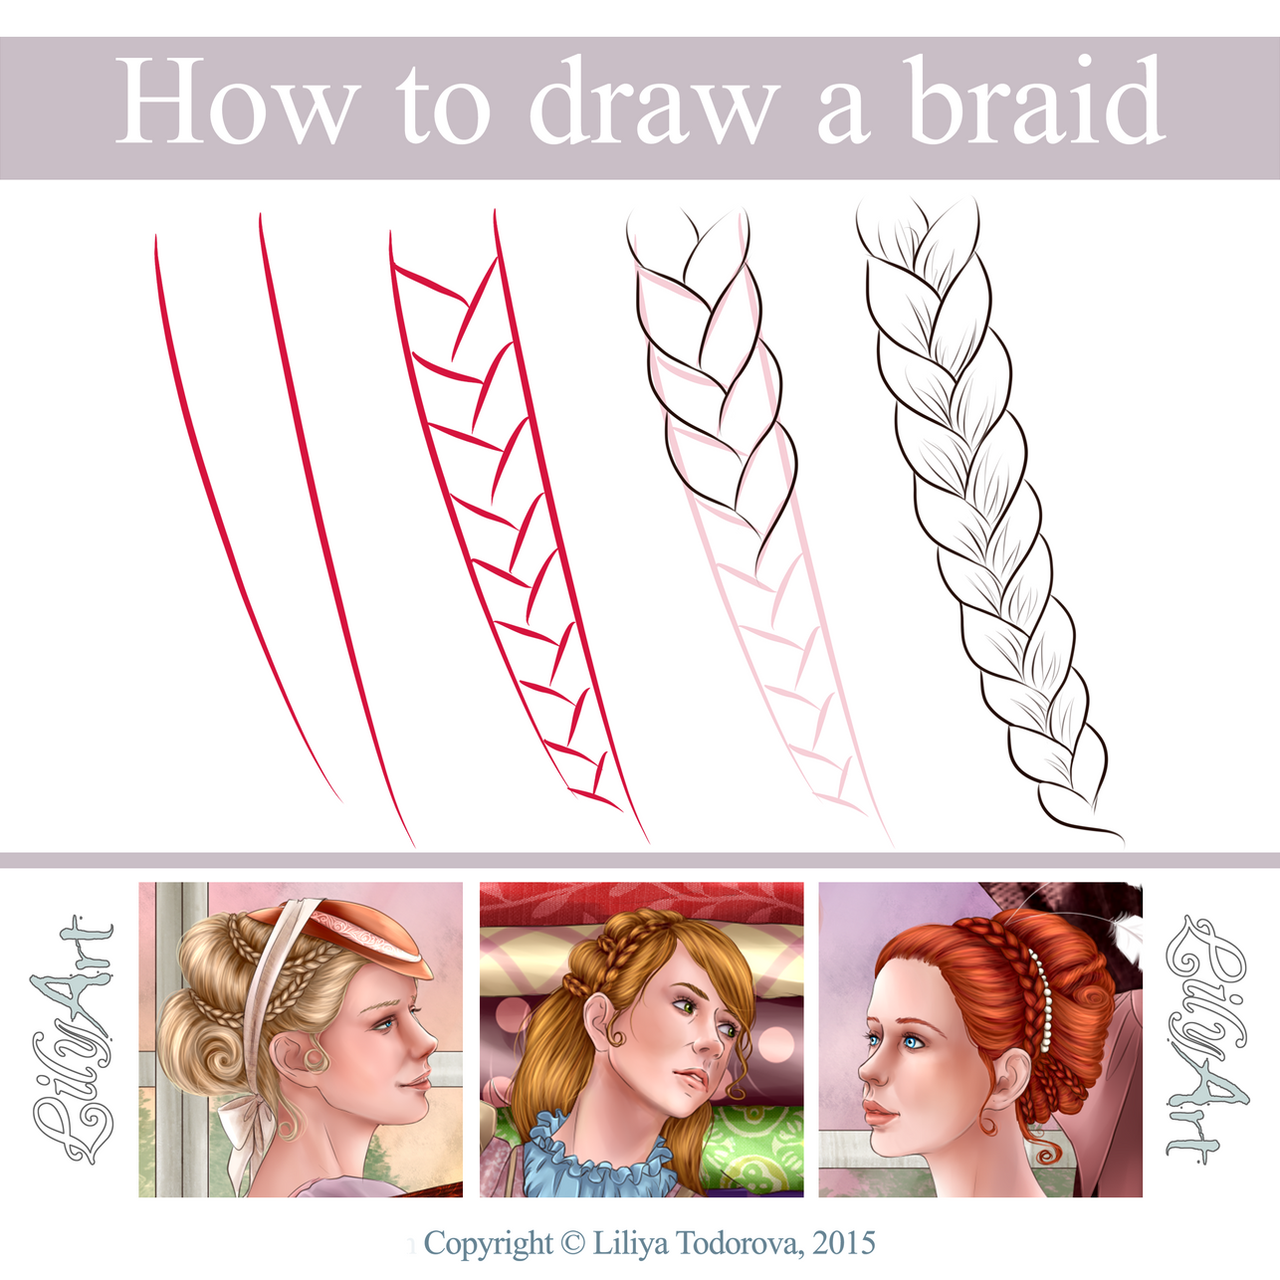
Step 1: Sketch the Path
- Draw a curvy line where you want the braid to go. Think of it as the spine of your braid—it can twist, turn, or hang straight.
- Why it works: This keeps your braid from looking stiff and gives it a natural flow.
Step 2: Divide Into Three
- At the top of your line, draw three equal sections—like three little blobs. These are your starting strands.
- Pro tip: Make them slightly uneven for a real-life feel. Perfect braids are rare outside of cartoons!
Step 3: Start the Weave
- Take the left section and cross it over the middle one. Now the left is in the middle.
- Then, take the right section and cross it over the new middle. Keep going, alternating sides.
- Visualize it: Imagine you’re braiding real hair—over, under, over, under.
Step 4: Taper It Down
- As you move down the path, make the sections a bit narrower. Braids naturally slim toward the end.
- Add flair: Tie it off with a scrunchie or let some strands fray out.
Step 5: Add Texture and Shadows
- Lightly sketch tiny lines along each section to show hair strands. Don’t overdo it—just a few for texture.
- Shade where the strands overlap to give it depth. Think: where would light not hit?
Common Mistakes to Dodge
- ❌ Drawing straight lines instead of curves—braids twist!
- ❌ Making all sections the same size—real braids vary a little.
- ✔️ Practice on scrap paper first to get the rhythm.
Level Up: Drawing Different Braid Styles
Once you’ve nailed the basic braid, why stop there? There’s a whole world of braid styles to play with—each with its own vibe. Let’s explore a few fan favorites and how to draw them.
French Braid: The Fancy Twist
- What it is: Hair gets added to the strands as you braid, starting at the scalp.
- How to draw it: Start with a small braid at the top, then widen it as you go down, adding “chunks” of hair from the sides.
- Cool detail: Show scalp lines peeking through at the top for that woven look.
Fishtail Braid: The Mermaid Dream
- What it is: Two sections of hair, with tiny pieces crossed over each other.
- How to draw it: Split the hair into two big parts, then add thin, diagonal lines crisscrossing between them. It looks like fish scales!
- Fun fact: I once overheard a hairstylist say fishtails are secretly easier to braid than they look—same goes for drawing them.
Box Braids: Bold and Beautiful
- What it is: Individual braids sectioned into squares, often with extensions.
- How to draw it: Sketch a grid on the scalp, then draw thin, even braids hanging down. Add beads or color for extra pizzazz.
- Unique twist: Show the scalp pattern—it’s like a map of the braid journey!
Which Style Matches Your Mood?
- French braid: Elegant and polished
- Fishtail: Playful and beachy
- Box braids: Strong and artistic
Secrets Most Artists Miss: Bringing Braids to Life
Here’s where we get sneaky—little details that turn a good braid into a great one. These are the things you won’t find in every tutorial, but they’ll make your drawings stand out.
Flyaways Are Your Friend
- Real braids have stray hairs sticking out. Add a few wiggly lines around the edges—especially near the end or where the braid bends.
- Why it’s awesome: It screams “lived-in” instead of “plastic doll.”
Light and Shadow Magic
- Hair reflects light, so pick a light source (say, the sun above). Shade the underside of each strand and leave the tops brighter.
- “Light gives hair life,” says artist Mia Carter, who’s sketched braids for comics. “It’s like the hair’s breathing.”
Tension Tells a Story
- Tight braids look neat and crisp—think a ballerina. Loose braids feel chill, like a lazy Sunday. Adjust how close the strands sit to show this.
- Example: A warrior character might have tight, battle-ready braids, while a dreamer has loose, flowing ones.
Texture Hacks
- Curly hair braids: Add zigzags along the edges.
- Straight hair braids: Keep lines smooth and sleek.
- Thick braids: Use wider sections and deeper shadows.
Tools of the Trade: What You Need to Draw Braids
You don’t need fancy gear to draw amazing braids, but the right tools can make it easier. Here’s what works best—and some surprising stuff you might already have!
Pencils: Your Best Buddy
- A regular #2 pencil is perfect for sketching. Go light at first so you can erase mistakes.
- Want more control? Try a mechanical pencil for thin, precise lines.
Erasers: The Unsung Hero
- A kneaded eraser lets you lift lines without wrecking your paper—great for fixing braid overlaps.
- “I’d be lost without my eraser,” laughs sketch artist Jamie Lee. “Braids are all about trial and error.”
Paper: Keep It Simple
- Plain printer paper works fine, but sketch paper (with a bit of texture) holds pencil marks better.
- Bonus: Draw on both sides to save trees!
Optional Upgrades
- Colored pencils: Add a pop of realism—browns, blacks, or even wild purples.
- Digital tablet: If you’re techy, apps like Procreate let you undo mistakes with a tap.
Practice Makes Perfect: Fun Exercises to Master Braids
Drawing braids is a skill, and like riding a bike, it takes practice. These quick exercises will get you comfy with the process—and they’re kinda fun, too!
Exercise 1: The Braid Wave
- Draw a wavy line across your page. Now, turn it into a braid by adding the three-strand pattern.
- Goal: Get used to braids that move and curve.
Exercise 2: Speed Braids
- Set a timer for 1 minute and draw as many mini braids as you can. Don’t worry about perfection—just go!
- Goal: Build muscle memory for the weave.
Exercise 3: Braid a Character
- Sketch a quick head, then add a braid in a style you like. Try different angles—side, back, over the shoulder.
- Goal: See how braids fit into a bigger picture.
Progress Tracker
| Day | What You Drew | How It Felt |
|---|---|---|
| 1 | Basic braid | Shaky but fun |
| 3 | French braid | Getting smoother |
| 7 | Box braids | Nailed it! |
Braids in Action: Adding Them to Your Characters
Braids aren’t just pretty—they say something about who’s wearing them. Let’s put them on characters and see how they shine.
Match the Vibe
- A shy girl might have a loose, messy braid tucked behind her ear.
- A bold hero could rock tight box braids with beads clinking in the wind.
Play with Angles
- Side view: Shows the weave pattern best.
- Front view: Highlights the scalp and start of the braid.
- Back view: Perfect for long, flowing braids.
Tell a Story
- Add dirt smudges to a braid for a rugged adventurer. Or weave in flowers for a festival-goer. Little touches like these make your art pop.
Character Idea Spark
- The Rebel: Messy fishtail braid with dyed tips.
- The Princess: Sleek French braid with a golden ribbon.
- The Explorer: Box braids tied back, ready for action.
Busting Myths: What You’ve Heard That’s Wrong
There’s a ton of bad advice out there about drawing braids. Let’s clear up some myths so you don’t waste time.
Myth 1: “Braids Need Tons of Detail”
- Nope! Too many lines make it look cluttered. Keep it simple and let shadows do the work.
Myth 2: “All Braids Look the Same”
- Not even close. A fishtail is wild and free, while a French braid is tight and tidy. Style matters!
Myth 3: “You Have to Be Good at Hair to Draw It”
- You don’t need to braid IRL to sketch one. It’s all about observing shapes and patterns.
Truth Bomb
“Anyone can learn this,” says art teacher Lila Brooks. “It’s less about talent and more about breaking it down.”
Science Meets Art: What Research Says About Hair
Believe it or not, science can help us draw better braids. Here’s some cool stuff I found that ties into our art.
Hair’s Physics
- Studies show hair moves like a spring—it twists and bounces. That’s why braids curve naturally, not in straight lines.
- Drawing tip: Add a slight “S” shape to your braid’s path for realism.
Light and Reflection
- Hair isn’t flat—it reflects light like a shiny thread. Research from optics labs says the curvier the surface, the more highlights you see.
- Apply it: Dot tiny bright spots where the braid bends.
Texture Matters
- Curly hair packs tighter in braids than straight hair, says a 2023 hair study. That’s why box braids on curly hair look chunkier.
- Sketch it: Widen sections for curly braids, slim them for straight.
Troubleshooting: Fix Your Braid Problems Fast
Stuck on a wonky braid? Here’s how to fix common hiccups.
Problem: It Looks Flat
- Fix: Add more shading under overlaps and lighten the tops. Depth = life!
Problem: The Pattern’s Off
- Fix: Trace back to where it went weird—usually a strand skipped or doubled. Redo that section.
Problem: Too Stiff
- Fix: Loosen your lines. Let the braid wiggle a bit, like it’s swaying in the breeze.
Quick Rescue Kit
- ✔️ Erase and retry small sections—don’t scrap the whole thing.
- ❌ Don’t force it if you’re tired—take a break and come back fresh.
Beyond the Basics: Advanced Braid Hacks
Ready to wow everyone? These tricks take your braids to the next level.
Layered Braids
- Draw a big braid, then add smaller ones peeking out—like a braid within a braid.
- Why it rocks: Adds complexity without much effort.
Wet Hair Effect
- Sketch tighter, shinier braids with fewer flyaways. Wet hair sticks together more.
- Try it: Perfect for a post-rain scene.
Braids in Motion
- Show the braid swinging with curved lines and a blurred tail. Think wind or a twirl.
- Cool factor: Makes your character feel alive.
Your Turn: Let’s Get Creative!
You’ve got the tools, the steps, and the secrets—now it’s time to draw! I’d love to hear how it goes. What braid style are you trying first? Got a character in mind? Drop a comment below and tell me about it. Or, if you’re feeling brave, share a pic of your sketch—I’ll cheer you on!
Fun Challenge
- Pick a braid type (French, fishtail, box) and draw it three ways: tight, loose, and wild. Which one’s your fave?
- Tag a friend who’d love this guide—they might join the braid-drawing party!
Let’s keep the creativity flowing. Happy sketching!
Leave your comment
Related posts