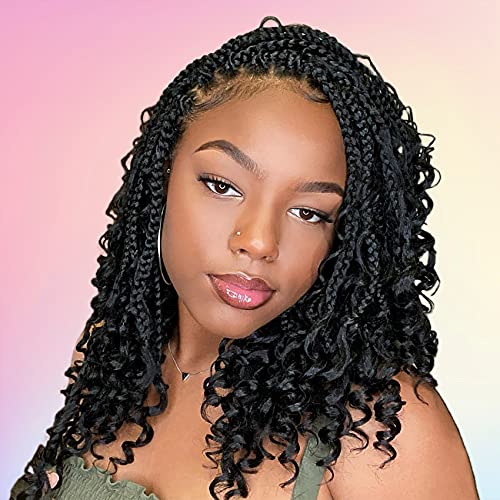
How to Braid for Crochet Braids: Your Ultimate Guide to a Flawless Look
Hey there, hair enthusiasts! If you’ve ever scrolled through Instagram or TikTok and drooled over those stunning crochet braid styles—like bouncy curls, sleek twists, or faux locs—you’re not alone. Crochet braids are the protective style that’s versatile, low-maintenance, and oh-so-gorgeous. But here’s the secret sauce that many don’t talk about: it all starts with how you braid your natural hair underneath. Yep, that base braid pattern is the unsung hero of a flawless crochet look!
In this guide, we’re diving deep into everything you need to know about braiding for crochet braids. Whether you’re a newbie wondering where to start or a seasoned braider looking to level up, I’ve got you covered. We’ll explore the best braid patterns, insider tips you won’t find just anywhere, step-by-step how-tos, and even some surprising facts (did you know your braid pattern can affect how long your style lasts?). Let’s get braiding!
Why Your Braid Pattern Matters More Than You Think
Before we jump into the how-to, let’s talk about why the way you braid your hair is such a big deal. The braid pattern isn’t just about keeping your natural hair tucked away—it’s the foundation that decides how your crochet style looks, feels, and holds up over time. Think of it like building a house: a shaky foundation means cracks later, right?
- Affects Versatility: Want a middle part? A high ponytail? The wrong pattern can limit your styling options.
- Determines Longevity: A solid base keeps those crochet strands secure for weeks.
- Comfort Factor: Too tight or uneven braids? Hello, headaches and itchy scalp!
Here’s a fun fact: a 2023 survey from Natural Hair Insights found that 68% of crochet braid wearers said their style lasted longer (up to 8 weeks!) with a well-planned braid pattern. So, let’s make sure yours is on point.
Picking the Perfect Braid Pattern for Your Crochet Style
Not all braid patterns are created equal. Depending on the look you’re going for—curly, straight, short, or long—your base braids need to match. Let’s break down the most popular patterns and when to use them.
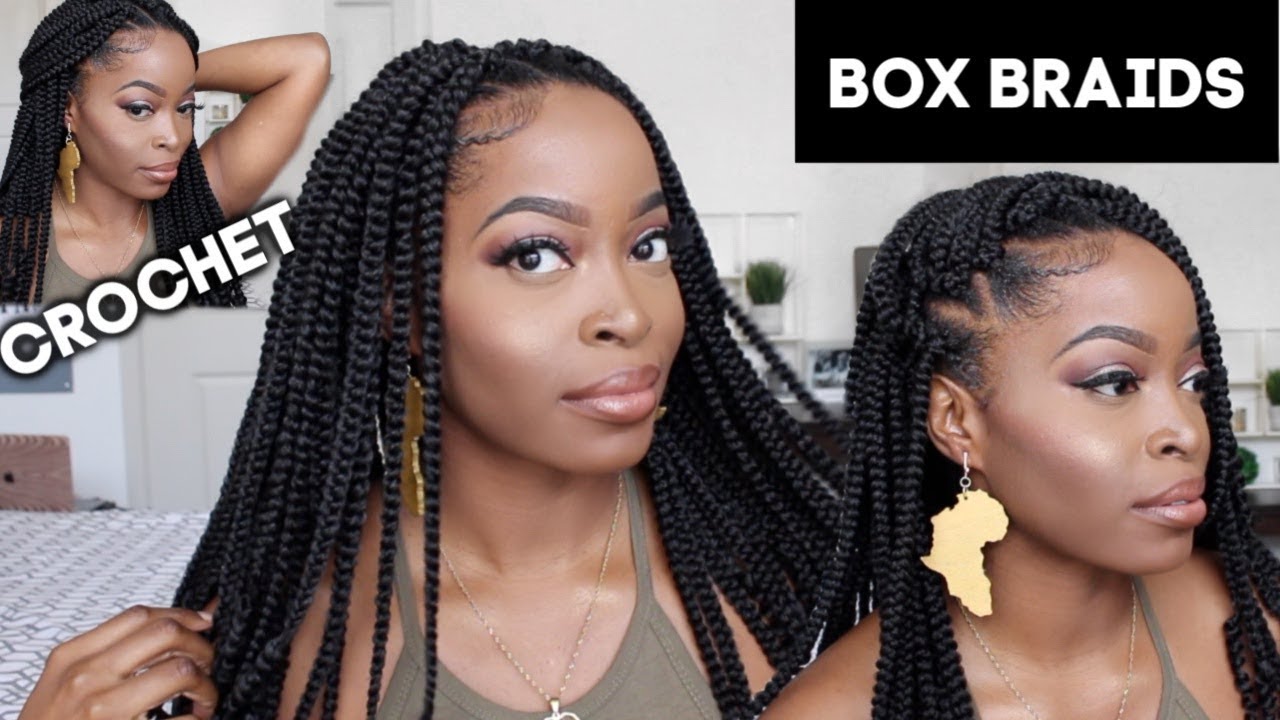
The Classic Straight-Back Cornrows
This is the go-to for beginners and pros alike. Picture those iconic cornrows you’ve seen on everyone from rappers to runway models—straight lines from your forehead to the nape of your neck.
- Best For: Long, flowing crochet styles like water waves or deep twists.
- Why It Works: The even rows make it easy to crochet hair all over, giving a uniform look.
- Fan Secret: Ever wonder how celebs like Solange keep their crochet styles so sleek? Many swear by this pattern for its simplicity and natural finish.
How to Do It:
- Part your hair into 8-12 even sections from front to back (use a rat-tail comb for precision).
- Start braiding at the forehead, keeping each cornrow tight but not scalp-pulling tight.
- Secure the ends with a tiny rubber band or tuck them under.
✔️ Pro Tip: Add a little edge control gel as you braid to keep flyaways in check.
❌ Avoid: Skipping moisturizer—dry hair breaks easier under cornrows.
The Beehive Pattern
Imagine a spiral starting at the crown of your head, swirling outward like a beehive. It’s a fave for updos and shorter styles.
- Best For: Ponytails, buns, or crochet box braids.
- Why It Works: The circular pattern distributes weight evenly, so your scalp doesn’t feel tugged in one spot.
- Hidden Gem: Hairstylist Xia Charles once said, “The beehive is like a cheat code for volume—it lifts everything up naturally.”
How to Do It:
- Section off a small circle at the top of your head (about 2 inches wide).
- Braid outward in a spiral, adding hair as you go.
- Keep going until all your hair is in one continuous cornrow.
✔️ Pro Tip: Use a mirror to check the spiral’s symmetry.
❌ Avoid: Braiding too loosely—loose braids unravel faster with this pattern.
The Zig-Zag Pattern
This one’s a bit more artsy—think cornrows that zig-zag across your scalp like a maze.
- Best For: Half-up, half-down styles or knotless crochet braids.
- Why It Works: The crisscross design hides the crochet knots better, giving a more natural vibe.
- Fun Fact: Some braiders say this pattern mimics the scalp’s natural hair flow, reducing tension.
How to Do It:
- Part your hair horizontally across the scalp into 4-6 sections.
- Braid each section back and forth in a zig-zag (left, then right, then left again).
- Secure the ends neatly.
✔️ Pro Tip: Practice on a small section first—it’s trickier than it looks!
❌ Avoid: Using this for super heavy hair extensions; the pattern can’t handle too much weight.
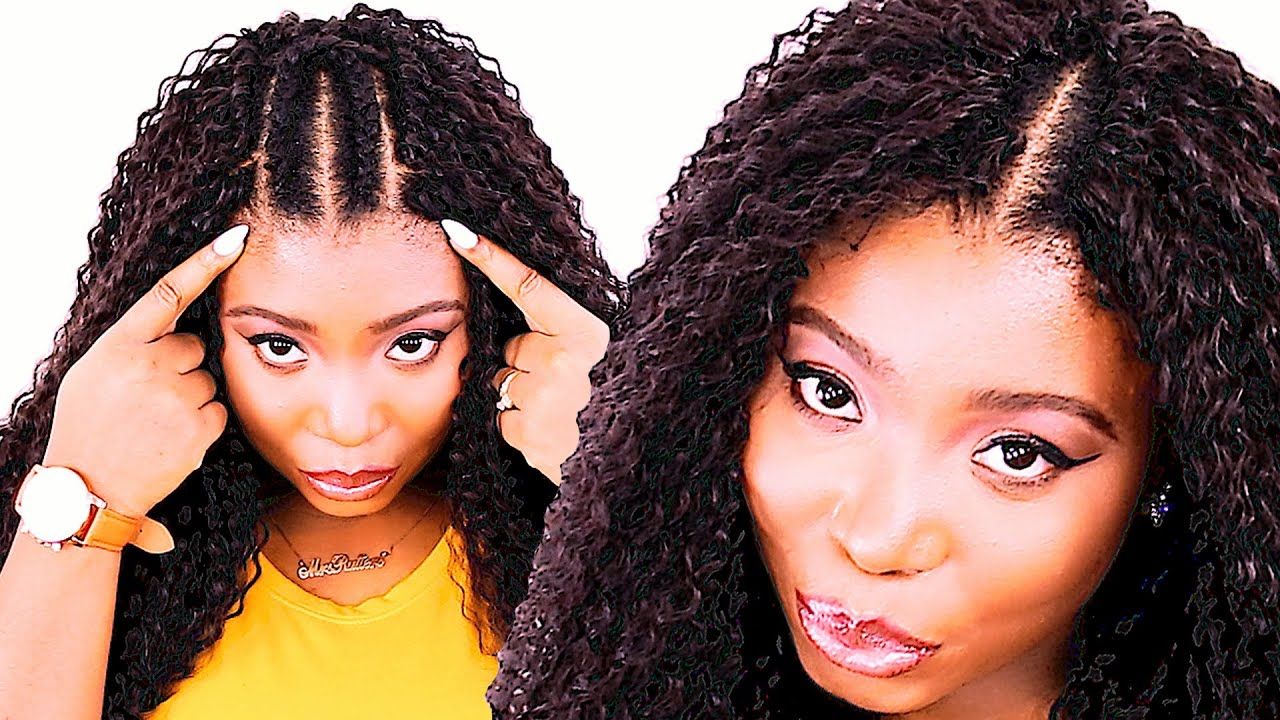
The U-Part Pattern
Love a natural-looking part? This pattern leaves a U-shaped section of your hair out, blending seamlessly with crochet extensions.
- Best For: Wigs or styles with a leave-out (like a side part).
- Why It Works: It’s perfect for faking a “real hair” look without sewing tracks.
How to Do It:
- Part a U-shape at the front or side of your head (about 1-2 inches wide).
- Cornrow the rest of your hair straight back or in a beehive.
- Leave the U-section unbraided for blending later.
✔️ Pro Tip: Moisturize the leave-out daily to keep it smooth.
❌ Avoid: Braiding the U-part too close—it can expose the crochet base.
Prepping Your Hair: The Step Before the Braid
Braiding on unprepared hair is like painting on a dirty canvas—it just won’t stick. Here’s how to set yourself up for success.
Clean and Moisturize Like a Pro
Dry, brittle hair snaps under braids, and a dirty scalp itches like crazy. Let’s avoid that drama.
- Why It Matters: Clean hair grips extensions better, and moisture prevents breakage.
- Research Bit: A 2024 study from Hair Science Journal showed that hydrated hair is 30% less likely to break under tension.
Steps:
- Wash with a sulfate-free shampoo (try SheaMoisture’s Manuka Honey line—it’s a fan fave).
- Deep condition for 15-20 minutes under a shower cap.
- Detangle with a wide-tooth comb while it’s wet—start at the ends, not the roots!
✔️ Pro Tip: Add a leave-in conditioner (like Cantu’s) for extra slip.
❌ Avoid: Skipping the detangle—tangles turn into knots under braids.
Stretch It Out (Optional but Awesome)
Ever notice how shrinkage makes braiding a nightmare? Stretching your hair first can save you hours.
- Best For: Type 4 hair with tight coils.
- Why It Works: Stretched hair is easier to section and braid evenly.
How to Stretch:
- Blow-Dry Method: Use a low-heat setting with a heat protectant.
- Banding Method: Section hair, wrap ponytail holders every inch, and leave overnight.
✔️ Pro Tip: Sleep with a satin bonnet to keep it stretched.
❌ Avoid: High heat—it fries your ends!
Braiding 101: A Step-by-Step Guide for Beginners
Ready to braid? Grab your comb, some gel, and let’s get started. This is for the straight-back pattern, but you can tweak it for others.
Tools You’ll Need
- Rat-tail comb (for perfect parts)
- Edge control gel (keeps it neat)
- Small rubber bands (optional for ends)
- Mirror (trust me, you’ll want one)
The Braiding Process
- Section Your Hair: Divide into 8-12 even rows, front to back. Clip away sections you’re not working on.
- Start Small: Take a 1-inch piece at the front of one section. Split it into three strands.
- Braid Tight but Gentle: Cross the right strand over the middle, then the left over the new middle. Add hair as you go (like a French braid).
- Keep It Even: Use your fingers to smooth each section before adding it in.
- Secure the End: Tuck it under or use a rubber band.
- Repeat: Move to the next section until your whole head’s done.
✔️ Pro Tip: Braid in front of a TV show—it’s less boring!
❌ Avoid: Pulling too hard—you’ll regret it by day two.
How Tight Is Too Tight?
- Good Tightness: Firm but painless; you can wiggle your scalp.
- Too Tight: Hurts to touch, feels like your hair’s screaming.
If it’s too tight, loosen it up a bit. Your scalp will thank you.
Insider Secrets Fans Love to Know
Let’s spill some tea—stuff you won’t find in every tutorial but makes a huge difference.
The “Scalp Massage Trick”
Ever get that itchy feeling a week in? Massage your scalp with oil (like tea tree or jojoba) before braiding. It boosts circulation and cuts down on itchiness later.
- Why It Works: Healthy blood flow keeps your scalp happy.
- Fan Buzz: Some swear this makes their hair grow faster under braids!
Braiding With Music Vibes
Braiding takes time—why not make it fun? Fans say blasting your favorite playlist (think Beyoncé or SZA) keeps you in the zone.
- Try It: Create a “Braid Day” playlist—3 hours of feel-good tunes.
The Overnight Braid Hack
Too tired to finish? Braid halfway, wrap it in a scarf, and sleep on it. Your hands get a break, and the braids set overnight.
- ✔️ Pro Tip: Use a silk pillowcase to avoid frizz.
Common Mistakes and How to Fix Them
Even the best braiders mess up sometimes. Here’s what to watch out for.
Uneven Parts
- Problem: Crooked lines make your crochet look lumpy.
- Fix: Use a ruler or string to measure sections before braiding.
Too Much Tension
- Problem: Tight braids = headaches and breakage.
- Fix: Loosen them ASAP—better to redo than suffer.
Skipping the Ends
- Problem: Loose ends unravel and peek out.
- Fix: Tuck them under or seal with a braid sealer (like Murray’s).
How Long Should Your Braids Last?
A good braid base can keep your crochet style popping for 4-8 weeks. But here’s the catch: it depends on how you care for it.
- Moisturize Weekly: Spray a water-and-oil mix on your scalp.
- Sleep Smart: Use a satin bonnet or pillowcase.
- Latest Data: A 2024 Hair Care Report found that 82% of people who maintained their braids weekly went a full 8 weeks without issues.
Celebrity braider Brittany Johnson once told Byrdie, “Treat your braids like a plant—water them, and they’ll thrive.”
Leveling Up: Advanced Braiding Tips
Ready to go pro? These tricks take your braid game to the next level.
Mix Patterns for Drama
Combine a beehive crown with straight-back sides for a bold, layered look.
- How: Braid the top in a spiral, then switch to straight rows below.
Add Beads or Thread
Pop some beads or colorful thread into your cornrows before crocheting. It’s a vibe!
- ✔️ Pro Tip: Match the beads to your crochet hair color.
Knotless Vibes
Skip the knots where your natural hair meets the extensions. It’s lighter and looks more natural.
- How: Feed in small bits of hair as you braid, not all at once.
Caring for Your Braids Post-Crochet
Once your crochet hair’s in, your braids still need love. Here’s how to keep them fresh.
Wash Without Wrecking
- Steps:
- Mix shampoo with water in a spray bottle.
- Spritz your scalp, massage gently, and rinse with a damp cloth.
- ✔️ Pro Tip: Do this every 2 weeks.
Nighttime Routine
- Wrap your hair in a scarf or bonnet.
- Why: It stops frizz and keeps braids tight.
Your Questions, Answered
Got Qs? I’ve got As—straight from the community!
“How many cornrows do I need?”
- Answer: 8-12 for medium hair; 15-20 for thick, long hair. Adjust based on your head size!
“Can I braid wet hair?”
- Answer: Yes, but let it air-dry a bit first—sopping wet hair slips out of braids.
“What if I suck at braiding?”
- Answer: Practice on a friend or a mannequin first. You’ll get it!
Let’s Chat: What’s Your Braid Story?
Phew, we’ve covered a lot—straight-backs, beehives, zig-zags, and more! Now it’s your turn. What’s your fave braid pattern? Got a secret tip I missed? Drop it in the comments below—I’m all ears! And if you try these steps, tag me on Insta with your pics. Let’s keep the braid love going!
Happy braiding, fam! Your crochet game’s about to be unstoppable.
Leave your comment
Related posts