How to Do Passion Twists with Braiding Hair: Your Ultimate DIY Guide
Hey there, hair enthusiasts! If you’ve been scrolling through Instagram or TikTok lately, you’ve probably seen those gorgeous, bouncy passion twists stealing the spotlight. They’re the perfect mix of protective style and boho vibes—low-maintenance yet totally glam. But here’s the thing: you don’t need to drop $200 at a salon to rock this look. With some braiding hair, a little patience, and this guide, you can DIY your passion twists at home. Let’s dive into everything you need to know—step-by-step tips, insider secrets, and even some quirky facts to make your twisting journey fun and fabulous!
What Are Passion Twists Anyway?
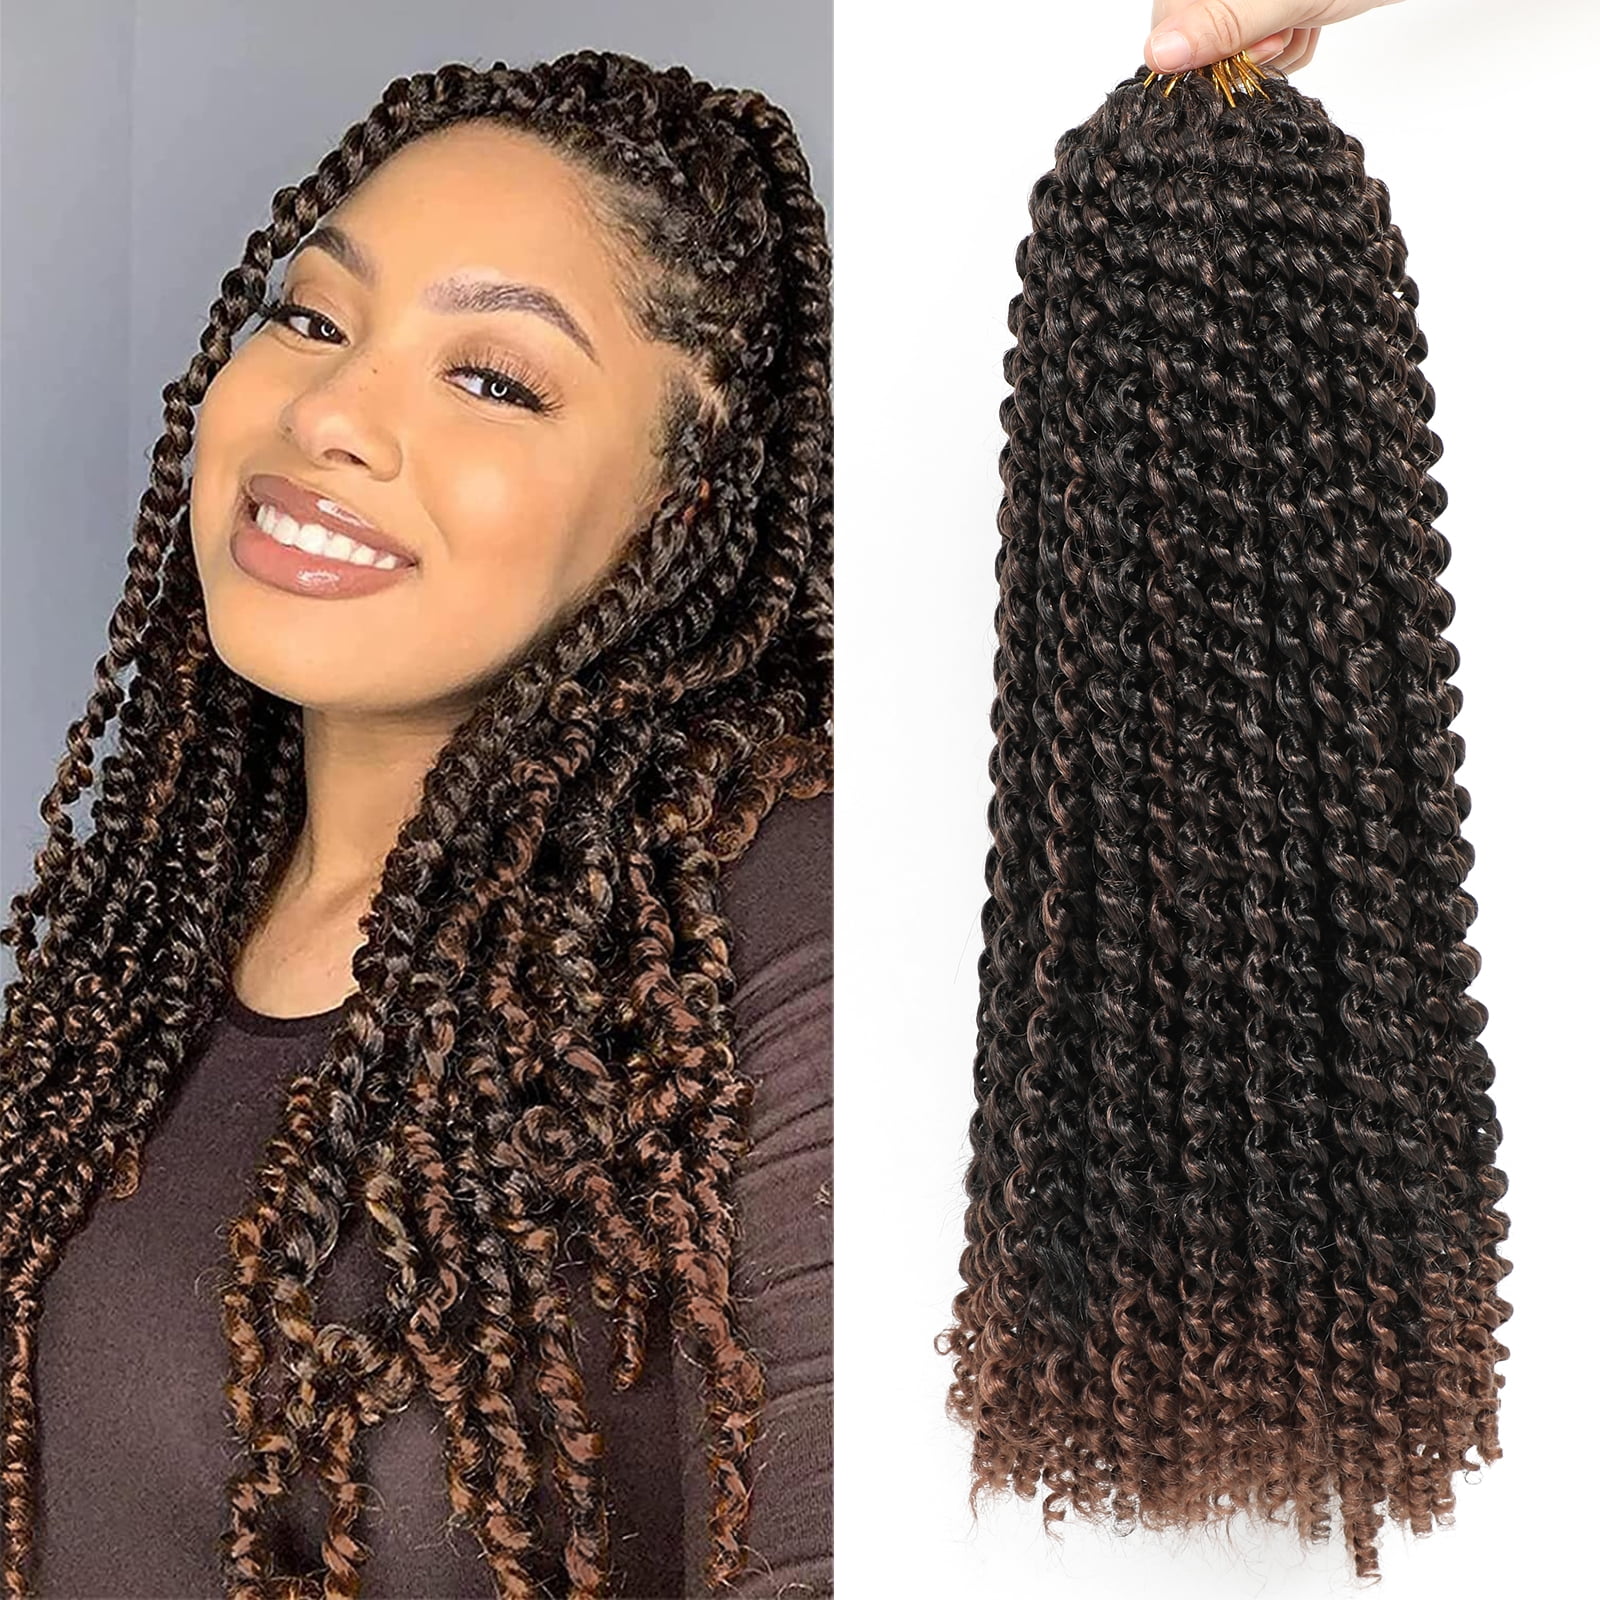
Passion twists are like the cool cousin of Senegalese twists and goddess locs. They’re a two-strand twist style made with curly or wavy braiding hair—usually something like FreeTress Water Wave—to give you that effortless, textured look. Created by Miami hairstylist Kailyn Rogers (aka The Boho Babe) in 2018, this style exploded online, racking up over a million #passiontwists posts on Instagram. Why? Because they’re lightweight, versatile, and perfect for protecting your natural hair while you slay.
Why Passion Twists Are More Than Just a Hairstyle
Sure, they look amazing, but passion twists are also a vibe. They’re named after Kailyn’s mom—how sweet is that? It’s a personal touch that makes this style feel like a love letter to creativity and self-expression. Plus, they’re a protective style, meaning they help your natural hair grow by keeping it tucked away from heat, wind, and daily wear-and-tear. Think of them as a cozy blanket for your strands!
Fun Fact: The Hidden Passion Twist Obsession
Did you know some fans are so obsessed with passion twists that they’ve started mini-collections of braiding hair in every color imaginable? From ruby red to ombre blonde, it’s like a secret stash of hair candy. Maybe you’ll be the next one hiding packs of FreeTress under your bed!
Prepping Your Hair: The Secret to Perfect Passion Twists
Before you even touch that braiding hair, your natural hair needs some TLC. Skipping this step is like baking a cake without preheating the oven—it just won’t turn out right. Here’s how to set yourself up for success.
Wash and Condition Like a Pro
Start with clean, hydrated hair. Use a sulfate-free shampoo to get rid of buildup—your scalp will thank you. Follow up with a deep conditioner (something with shea butter or coconut oil works wonders) and let it sit for 15-30 minutes under a shower cap. Why? Hydrated hair is less likely to break during twisting.
- ✔️ Pro Tip: Add a teaspoon of olive oil to your conditioner for extra moisture.
- ❌ Don’t: Skip conditioning—dry hair tangles more and makes twisting a nightmare.
Stretch Your Hair (No Yoga Required)
Passion twists work best on stretched hair—it’s easier to section and twist evenly. You don’t need a blow-dryer if you’re heat-free (yay for healthy hair!). Try these instead:
- Banding Method: Section your damp hair into four parts, wrap small hair ties every inch or so down each section, and let it air-dry overnight.
- Twist-Out Trick: Do big two-strand twists on wet hair, unravel them when dry, and voilà—stretched hair ready to go.
Insider Secret: Vinegar Bath for Braiding Hair
Here’s something you won’t find in every tutorial: soak your braiding hair in a vinegar-water mix (1 cup vinegar to a bowl of lukewarm water) for 2 hours before using it. Rinse and air-dry. This strips off the chemical coating that can itch your scalp. Trust me, your head will feel so much happier!
Tools and Supplies: What You’ll Need
You don’t need a fancy kit—just a few basics. Here’s your shopping list:
| Item | Why You Need It | Where to Get It |
|---|---|---|
| FreeTress Water Wave Hair | Gives that signature curly, boho look | Beauty supply stores, Amazon |
| Rat-tail comb | For neat parting | Dollar store |
| Edge control gel | Keeps roots sleek | Drugstore (e.g., Eco Styler) |
| Hair clips | Holds sections out of the way | Any store with hair stuff |
| Spray bottle with water | Keeps hair damp and workable | Reuse an old one |
| Mousse (optional) | Defines twists and reduces frizz | Drugstore |
How Much Hair Do You Need?
For medium-length twists (shoulder to chest), grab 6-8 packs of FreeTress Water Wave (22-inch is a fan favorite). Want jumbo twists? Use fewer packs but bigger sections. Short bob style? 4-5 packs should do it. Pro tip: buy an extra pack—you’ll thank yourself if you run out mid-twist!
Quirky Tip: Color Your World
Ever thought of sneaking in a pop of color? Some twist-lovers dye their braiding hair with fabric dye before installing—think pastel pink or fiery red. It’s a fun way to stand out without committing to permanent hair dye.

Step-by-Step: How to Do Passion Twists Like a Boss
Ready to twist? Grab your supplies, put on your favorite playlist (I’m talking Beyoncé or SZA vibes), and let’s get started. This is the rubber band method—easy, secure, and beginner-friendly.
Step 1: Section Your Hair
- Use your rat-tail comb to part your hair into small squares (1-2 inches wide, depending on how thick you want your twists).
- Clip away the sections you’re not working on yet.
- ✔️ Tip: Smaller sections = more twists, longer install time. Bigger sections = faster but chunkier twists.
Step 2: Secure with Rubber Bands
- Take a section of your natural hair, apply a dab of edge control at the root, and smooth it down.
- Tie a small rubber band around the base (not too tight—your scalp needs to breathe!).
- ❌ Don’t: Use super tiny bands—they’re harder to remove and can snag.
Step 3: Prep the Braiding Hair
- Take one piece of FreeTress Water Wave hair and stretch it slightly to loosen the curls.
- Fold it in half so it forms a U-shape—this is where the magic happens.
Step 4: Attach and Twist
- Slip the U-shaped braiding hair under the rubber band so your natural hair sits in the middle.
- Split your natural hair in two and blend each half with one side of the braiding hair.
- Twist the two strands together tightly for an inch, then let them coil naturally down to the ends.
- ✔️ Tip: Twist in one direction (e.g., clockwise) the whole time for a uniform look.
Step 5: Repeat and Perfect
- Work your way across your head, section by section. Take breaks if your fingers cramp—nobody’s judging!
- Once done, dab mousse on the ends to define them and trim any stragglers for a polished finish.
Time Check: How Long Will This Take?
First-timers, expect 6-10 hours depending on hair length and twist size. Enlist a friend for the back sections—it’s way faster (and more fun) with a buddy. Celebrity stylist Ursula Stephen says, “Patience is key with passion twists. It’s a marathon, not a sprint, but the results are worth it.”
Caring for Your Passion Twists: Keep Them Fresh
You’ve got your twists—now how do you make them last? Good maintenance is the difference between a month of fab hair and a frizzy mess in two weeks.
Nighttime Routine: Protect Your Investment
- Pineapple It: Pile your twists into a high ponytail and cover with a satin bonnet or scarf.
- Silk Pillowcase Hack: If you’re a wild sleeper, swap your cotton pillowcase for silk—it reduces friction and keeps twists smooth.
- ✔️ Bonus: Add a drop of lavender oil to your bonnet for a calming scent.
Washing Without Wrecking
You can wash passion twists, but less is more. Aim for once every 2-3 weeks:
- Mix shampoo with water in a spray bottle.
- Spritz your scalp, massage gently, and rinse with a damp cloth.
- Pat dry—don’t rub, or you’ll unleash the frizz monster!
Oil Up (But Not Too Much)
Lightly oil your scalp with jojoba or grapeseed oil every few days to keep it moisturized. Avoid drenching the twists—synthetic hair doesn’t soak up oil like natural hair does, so it’ll just sit there looking greasy.
How Long Do They Last?
With proper care, passion twists can stay fresh for 6-8 weeks. After that, they start to loosen and fuzz up—it’s your cue to take them down. Don’t push it past 10 weeks; your natural hair might start matting.

Troubleshooting: Fixing Common Passion Twist Problems
Even the best DIY-ers hit snags. Here’s how to handle the top issues.
Frizz Taking Over?
Frizz is normal with passion twists—it’s part of their boho charm! But if it’s too much:
- Smooth with a little mousse or braiding gel.
- Re-twist loose sections at night and unravel in the morning.
Itchy Scalp Driving You Crazy?
- Rinse with an apple cider vinegar mix (1 part ACV, 3 parts water) to soothe irritation.
- Check your braiding hair—did you skip the vinegar bath? That coating might be the culprit.
Twists Slipping Out?
If they’re sliding down, your sections might be too small or the rubber bands too loose. Next time, tighten up (gently!) and braid the first inch tighter before twisting.
Styling Ideas: Switch Up Your Passion Twists
One of the best things about passion twists? You can style them a million ways. Here are some fresh ideas to keep your look popping.
Half-Up, Half-Down
- Pull the top half into a cute bun or ponytail, leaving the rest loose.
- Add gold hair cuffs for extra flair.
Jumbo Bun Vibes
- Sweep all your twists into a high bun—perfect for hot days or when you’re feeling extra bold.
- Wrap a colorful scarf around the base for a retro twist.
Side Part Sass
- Part your twists to one side for a sleek, asymmetrical look.
- Lay your edges with gel and a toothbrush for that snatched finish.
Color Play
Already got colored braiding hair? Mix in a few strands of a contrasting shade (like purple in black twists) for a subtle pop only your besties will notice.

The Science Behind Passion Twists: What’s New in 2025?
Hair care isn’t just art—it’s science too! Recent studies give us fresh insight into why passion twists work so well.
Protective Power Backed by Research
A 2023 study from the Journal of Cosmetic Dermatology found that protective styles like twists reduce breakage by 40% compared to loose hair exposed to daily styling. The key? Less manipulation. Passion twists tuck your ends away, letting your hair chill and grow.
Synthetic Hair Safety Update
Consumer Reports dropped a bombshell in February 2025: they tested synthetic braiding hair and found VOCs (volatile organic compounds) and even lead in some brands. Yikes! Stick to reputable brands like FreeTress or X-Pression, and always do that vinegar soak to cut down on chemicals. Hairstylist Dereq Clark warns, “Cheap hair might save you money upfront, but it can cost your scalp’s health.”
Growth Boost?
Anecdotal evidence from hair forums (hello, Reddit!) suggests passion twists might boost growth by reducing tension on your roots compared to box braids. No hard data yet, but the lightweight feel could be a game-changer for sensitive scalps.
Passion Twists vs. Other Styles: What’s the Difference?
Wondering how passion twists stack up against box braids or faux locs? Let’s break it down.
| Style | Install Time | Weight | Texture | Lasts |
|---|---|---|---|---|
| Passion Twists | 6-10 hours | Light | Curly, boho | 6-8 weeks |
| Box Braids | 4-8 hours | Medium | Straight, sleek | 6-10 weeks |
| Faux Locs | 8-12 hours | Heavy | Faux dreads | 8-12 weeks |
Why Choose Passion Twists?
- Lightweight: Easier on your scalp than locs.
- Faster than Locs: Less time in the chair (or on your couch).
- Curly Charm: That water wave texture beats plain braids for a fun, free-spirited look.
Insider Secrets from Passion Twist Fans
I’ve chatted with twist enthusiasts online and IRL, and they’ve spilled some tea you won’t find in basic tutorials.
The Freezer Trick
One fan swears by this: after twisting, dip the ends in hot water, then pop your head in the freezer for 5 minutes. Sounds wild, but she says it locks in the curl pattern longer. (Try at your own risk—I haven’t tested this one yet!)
The Sock Method
Tired of bonnets slipping off? Wrap your twists in a clean tube sock tied at the end. It’s snug, cheap, and oddly stylish in a quirky way.
Scented Twists
A few devotees add a drop of essential oil (like peppermint) to their braiding hair before installing. It’s subtle, but you’ll catch whiffs of freshness all day.
Taking Them Down: The Gentle Way
After 6-8 weeks, it’s time to say goodbye. Here’s how to remove passion twists without a meltdown.
Step-by-Step Removal
- Oil Up: Rub coconut oil into each twist to loosen the braiding hair.
- Unravel: Gently untwist from the ends up—don’t yank!
- Detangle: Use your fingers or a wide-tooth comb with conditioner to free your natural hair.
- Wash: Cleanse and deep condition to refresh your strands.
Avoid Damage
- ✔️ Do: Take your time—rushing leads to breakage.
- ❌ Don’t: Cut the twists off unless they’re super matted (and even then, consult a pro first).
FAQs: Your Burning Passion Twist Questions Answered
Got questions? I’ve got answers—straight from the twist trenches.
Can I Do Passion Twists on Short Hair?
Yes! Even 2-3 inches of natural hair works—just blend it well with the braiding hair. Go for smaller twists to hide the transition.
Are They Heavy?
Nope! Passion twists are lighter than box braids or locs because of the wavy hair’s airy texture. Your neck will thank you.
Can I Swim with Them?
Totally! They’re water-friendly—just co-wash after and add mousse to keep them defined. Kailyn Rogers herself says, “Passion twists were made for living life—don’t be afraid to get them wet!”
Final Thoughts: Why You’ll Love Passion Twists
Passion twists aren’t just a hairstyle—they’re a mood. They’re for the free spirits, the DIY queens, and anyone who wants to protect their hair while looking fly. With this guide, you’ve got all the tools to twist like a pro, troubleshoot like a stylist, and style like a trendsetter. So grab that braiding hair, crank up your tunes, and let’s make some magic happen!
Let’s Chat!
What’s your favorite passion twist hack? Tried a wild color or styling trick? Drop it in the comments—I’m dying to hear your stories! And if you’re rocking your twists right now, tag me on Insta—I’d love to hype you up!
