How to Take Out Crochet Braids: Your Ultimate Step-by-Step Guide
Hey there, braid lovers! So, you’ve rocked your crochet braids for weeks, turning heads with those gorgeous twists or curls. But now, it’s time to say goodbye and let your natural hair breathe again. Taking out crochet braids might sound simple—just snip, pull, and done, right? Not quite! If you want to keep your hair healthy, avoid a tangled mess, and maybe even reuse those braids later, there’s a little more to it. Don’t worry—I’ve got you covered with everything you need to know, from secret tips to must-have tools, all written in a way that’s easy to follow and fun to read.
I’ve been obsessed with crochet braids since I first tried them in high school. They’re my go-to protective style when I want to switch things up without spending hours in a salon chair. But here’s a little confession: the first time I took them out, I turned my bathroom into a hair battlefield—strands everywhere, a sore scalp, and a lot of regret. Since then, I’ve learned the hard way (and done some digging) to figure out the best, gentlest, and fastest ways to remove crochet braids. This guide isn’t just a how-to—it’s packed with insider tricks, real-life hacks, and even some quirky facts fans like you might love. Ready? Let’s dive in!
Why Taking Out Crochet Braids the Right Way Matters
Before we get into the nitty-gritty, let’s talk about why this process deserves your attention. Crochet braids are amazing—they’re quick to install, versatile, and give your natural hair a break from heat and styling. But if you rip them out carelessly, you’re risking breakage, scalp irritation, and even hair loss around your edges. Trust me, I’ve seen friends cry over a botched takedown, and I don’t want that for you!
Here’s the deal: your natural hair is looped or braided under those synthetic strands. Pulling too hard or skipping steps can damage those precious curls or coils. Plus, a proper removal keeps your scalp happy and your hair ready for its next adventure—whether that’s a new style or just rocking your natural texture.
Fun Fact Fans Will Love
Did you know crochet braids have been around since the ‘90s? They made a big comeback thanks to the natural hair movement, and now they’re a staple for anyone who loves low-maintenance glam. I’m a bit of a history nerd, so I think it’s cool how this style connects us to decades past—kind of like wearing a piece of hair heritage!
What You’ll Need: Your Crochet Braid Removal Toolkit
Let’s set you up for success. You don’t need a fancy salon setup—just a few everyday items that make a big difference. Here’s your must-have list, plus some optional extras I swear by:
Essentials
- Sharp scissors: For cutting the synthetic hair safely.
- Wide-tooth comb: To detangle without pulling.
- Spray bottle with water and conditioner: Keeps your hair moisturized and slippery.
- Hair clips or ties: To section your hair and keep things organized.
- Mirror: A handheld one works great for seeing the back.
My Secret Weapons
- Coconut or olive oil: A little dab loosens tight knots like magic.
- Old towel: Catches all the loose hair (and saves your floor!).
- A good playlist: I blast ‘90s R&B—think TLC or Destiny’s Child—to make it feel like a self-care party.
Quick Tip
Skip the cheap scissors from the dollar store. A sharp, precise pair (like hair shears) cuts cleanly and keeps you from accidentally snipping your real hair. I learned this after a near-disaster with dull blades—yikes!
Step-by-Step: How to Take Out Crochet Braids Like a Pro
Ready to get started? This is where the magic happens. Follow these steps, and you’ll be braid-free in no time—without the stress or damage. I’ve broken it down into bite-sized chunks so you can go at your own pace.
Step 1: Prep Your Space and Mindset
- Core Idea: A calm setup = a calm you.
- Why It Works: Rushing leads to mistakes. Think of this as a mini spa day for your hair.
- How-To:
- Clear a spot with good lighting—your bathroom or bedroom works great.
- Lay down that old towel to catch the mess.
- Tie back your hair if it’s long, and keep snacks out of reach (greasy fingers are a no-no!).
- Cue up your favorite tunes or podcast. I’m hooked on true crime stories—keeps me focused!
Step 2: Section Your Hair
- Core Idea: Small sections make the job manageable.
- Why It Works: Tackling one area at a time prevents overwhelm and missed spots.
- How-To:
- Use clips or ties to divide your hair into 4-6 sections (more if your hair’s thick).
- Start at the back or bottom—it’s easier to work up as you go.
- Spritz each section lightly with your water-conditioner mix to keep it soft.
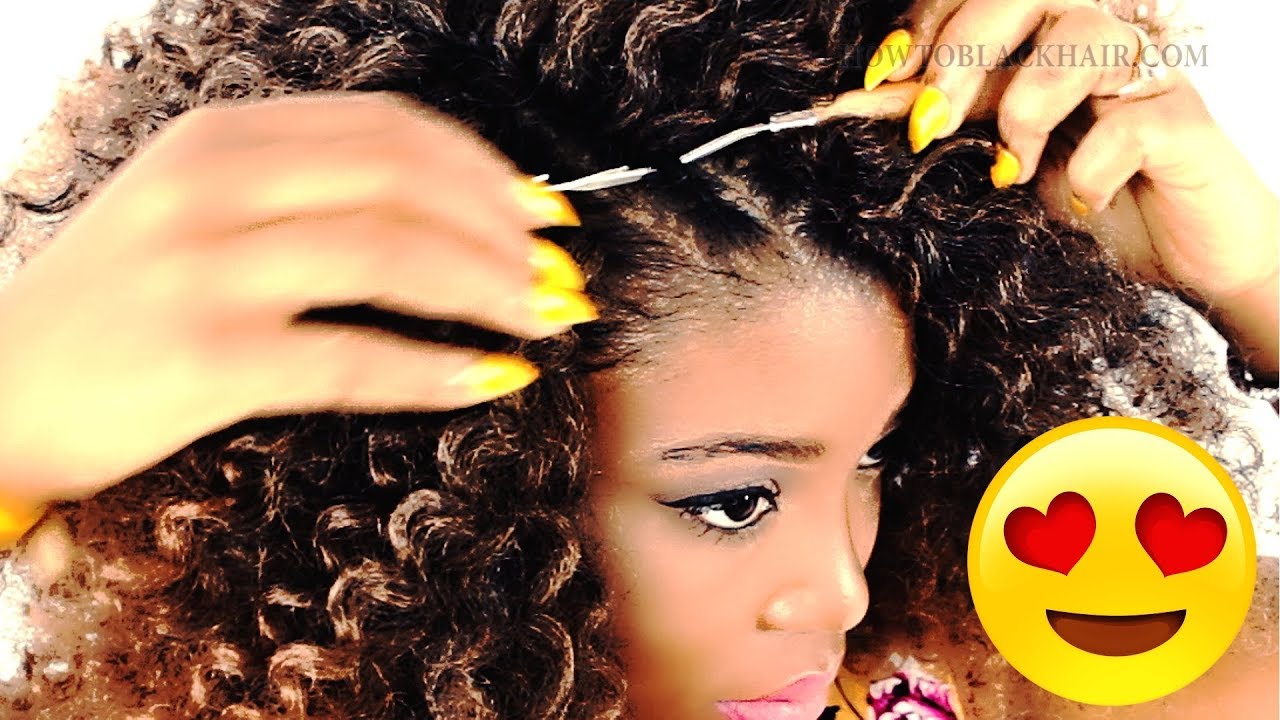
Step 3: Find and Cut the Crochet Hair
- Core Idea: Trim smart to save your natural strands.
- Expert Insight: “Always cut a few inches above where your real hair ends,” says hairstylist Maya Jones. “It’s better to trim twice than snip too close and regret it.”
- How-To:
- Run your fingers along each braid to find where the synthetic hair loops into your natural hair.
- Look for thicker spots—that’s usually the knot or loop.
- Cut the crochet hair 2-3 inches above that spot. Steady hands are key!
- Repeat for each braid in the section.
Step 4: Unloop and Unravel
- Core Idea: Gentle sliding beats hard pulling.
- Why It Works: This protects your roots and prevents breakage.
- How-To:
- Find the loop where the crochet hair hooks into your cornrow.
- Slide the synthetic hair out gently—like unhooking a necklace clasp.
- Unravel the braid from root to tip. If it’s tangled, dab on some oil to loosen it up.
- Toss the removed hair onto your towel.
Step 5: Detangle Your Natural Hair
- Core Idea: Patience here saves strands later.
- Why It Works: Wet, conditioned hair detangles easier and breaks less.
- How-To:
- Spray your freed natural hair with more water-conditioner mix.
- Start at the ends with your wide-tooth comb, working up to the roots.
- Go slow—think of it like untangling a friendship bracelet, not a race.
Step 6: Repeat and Pamper
- Core Idea: Finish strong and treat your hair.
- How-To:
- Move to the next section and repeat steps 3-5 until all braids are out.
- Once done, give your scalp a gentle massage with oil—pure bliss!
- Wash and deep condition your hair to reset it for whatever’s next.
Common Mistakes to Avoid (And How to Fix Them)
Even with the best plan, things can go sideways. Here’s what to watch out for, plus quick fixes if you hit a snag.
❌ Cutting Too Close to Your Real Hair
- What Happens: You nick your natural strands and end up with an uneven trim.
- Fix It: Cut in two stages—first a few inches out, then closer once you’re sure where the crochet ends.
❌ Pulling Too Hard
- What Happens: Ouch! Sore scalp and broken hair.
- Fix It: Stop, apply oil, and wiggle the braid loose instead of yanking.
❌ Skipping Moisture
- What Happens: Dry hair tangles more and snaps easier.
- Fix It: Keep that spray bottle handy and use it generously.
✔️ Pro Tip
If you’re stuck on a stubborn knot, don’t force it. “Patience is your best tool,” says natural hair guru Lisa Carter. “A little oil and time can undo almost anything.”
How Long Does It Take? Timing Tips for Busy Bees
Wondering how much time to set aside? It depends on a few things:
- Hair thickness: Thicker hair = more braids = more time.
- Braid size: Smaller braids take longer to unravel.
- Experience: First-timers might need an hour or two; pros can do it in 30-45 minutes.
My Timing Hack
I break it into chunks—two sections one night, two the next. Pop in a movie (I’m a sucker for rom-coms like The Princess Diaries), and it flies by. No rush, no stress!
Can You Reuse Crochet Braids? The Truth Fans Want to Know
Here’s a question I get all the time: “Can I save my crochet hair for round two?” The answer? Sometimes! It’s a little-known perk that can save you cash and time.
When It Works
- Straight or twisted styles: These hold up better than curly ones.
- Gentle removal: Unlooping without cutting keeps the hair intact.
- Good quality: High-end synthetic hair (like Kanekalon) lasts longer.
When It Doesn’t
- Curly or matted hair: Once it’s tangled, it’s trash.
- Worn too long: After 6-8 weeks, it’s usually too frizzy to reuse.
How to Save It
- Unloop carefully instead of cutting.
- Store in a ziplock bag—label it with the style and date (I’m a bit of a neat freak!).
- Wash with a mild shampoo before reusing to refresh it.
Insider Secrets: Little-Known Tips to Make It Easier
I’ve picked up some tricks over the years that you won’t find in every guide. These are my personal faves—perfect for fans who love a behind-the-scenes peek!
The Oil Trick
Dab a tiny bit of coconut oil on your fingertips before unlooping. It’s like WD-40 for hair—everything slides right out. I discovered this by accident when I was cooking and had oily hands—total game-changer!
The Mirror Hack
Use two mirrors—one in front, one handheld—to see the back of your head. It’s like having eyes in the back of your skull. I’m obsessed with gadgets, so this feels like a spy mission!
The Friend Factor
Recruit a buddy who owes you a favor. Four hands are faster than two, and it’s a great excuse to gossip. My bestie and I turn it into a mini hangout—popcorn included!
What Science Says: Keeping Your Hair Healthy Post-Removal
Let’s geek out for a sec. Studies show protective styles like crochet braids can reduce breakage—by up to 30%, according to a 2019 hair health report from the Journal of Cosmetic Dermatology. But the catch? Only if you remove them right. Pulling too hard or skipping detangling can undo all that protection.
Scalp Health Bonus
Massaging your scalp after removal boosts blood flow, which a 2021 study linked to stronger hair growth. Add a drop of peppermint oil (my fave—it tingles!) for an extra kick.
Aftercare: Loving Your Hair Post-Crochet
Your braids are out—now what? This is your chance to pamper your hair and set it up for success.
Quick Aftercare Routine
- Wash: Use a sulfate-free shampoo to clear buildup.
- Deep Condition: Slather on a thick mask for 20-30 minutes—pure hydration heaven.
- Trim: Snip any split ends to keep things fresh.
- Moisturize: Lock in softness with a leave-in conditioner.
My Go-To
I’m a DIY junkie, so I mix honey and avocado for a natural mask. It smells amazing and leaves my curls bouncy—fans always ask how I keep them so shiny!
Troubleshooting: Answers to Your Burning Questions
Got a specific problem? I’ve got you. Here are the top questions fans ask me, answered with real talk.
“My scalp itches after taking them out—what’s up?”
- Answer: Could be buildup or irritation. Wash with a clarifying shampoo and massage with tea tree oil—it’s soothing and kills bacteria.
“I cut my real hair by mistake—help!”
- Answer: Don’t panic! It’ll grow back. Focus on moisture and avoid heat for a few weeks to baby those strands.
“How do I avoid tangles next time?”
- Answer: Moisturize your natural hair before installing, and don’t let the braids sit past 8 weeks—matting gets worse after that.
Bonus: Styles to Try After Removal
Now that your hair’s free, why not experiment? Here are some ideas I love:
- Twist-out: Defines your curls with zero heat.
- Bantu knots: Cute and protective.
- Wash-and-go: Show off your natural texture—I’m addicted to watching my coils pop!
Leave your comment
Related posts